Commissioning and Maintenance of Siemens 3WT Circuit Breaker

Siemens circuit breaker 3WT debugging method

1. Store energy on the stored energy spring mechanism

Warning: It may cause personal injury. When the Siemens circuit breaker is removed from the system with the energy storage spring mechanism in a discharged state, it must be placed on a stable surface (for example, on a workbench used for maintenance).

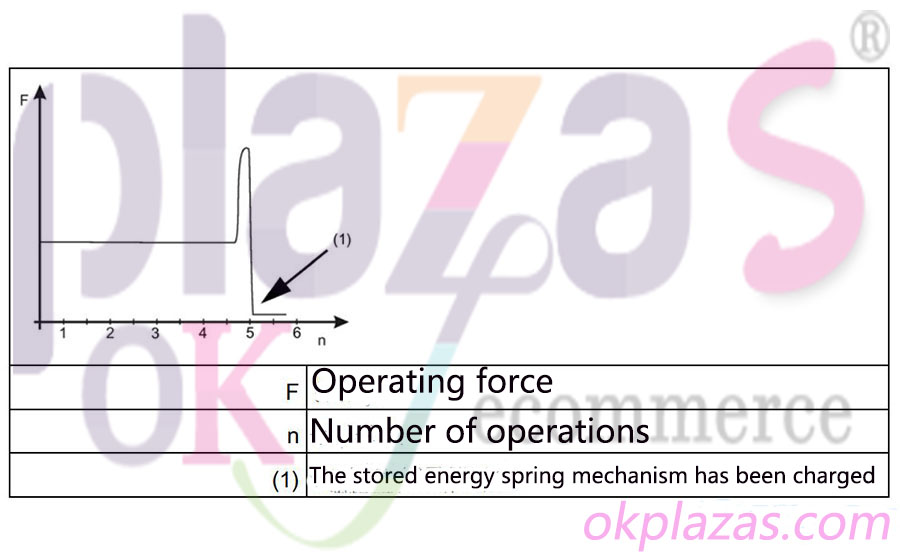
1.1.Manual energy storage (as shown below)

Transmitter|Encoder|Soft starter|Power supply|VFD|Light curtain|Servo products|Human-machine interface|Solenoid valve|Cylinder|Actuator|Flow meter|Transformer|Thyristor|Sensor|Deceleration drive gearbox reducer|Linear guide|Circuit breaker|Refrigeration compressorAll industrial products of okplazas are purchased from the original factory or formal channels of agents to ensure the original authenticity, which perfectly solves the problem of industrial product sample procurement and small-batch procurement for the majority of engineers and purchasing personnel.

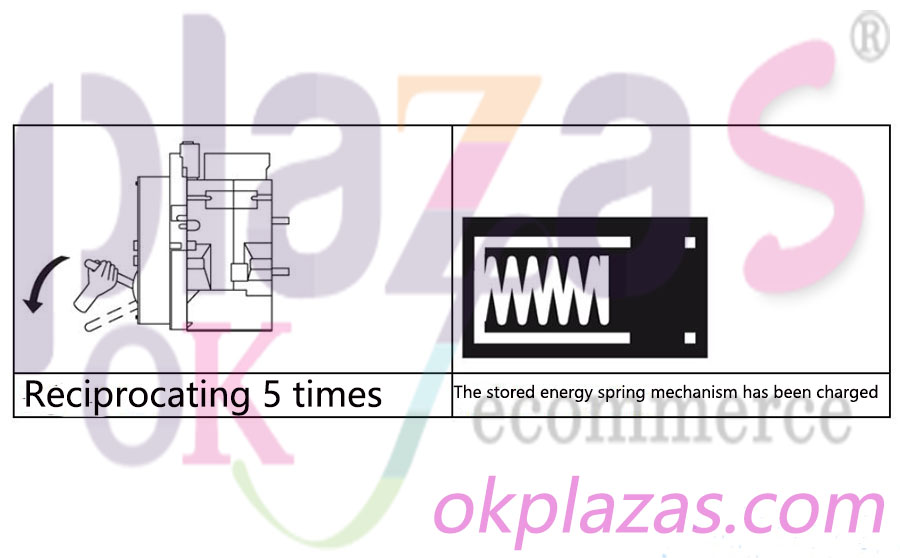
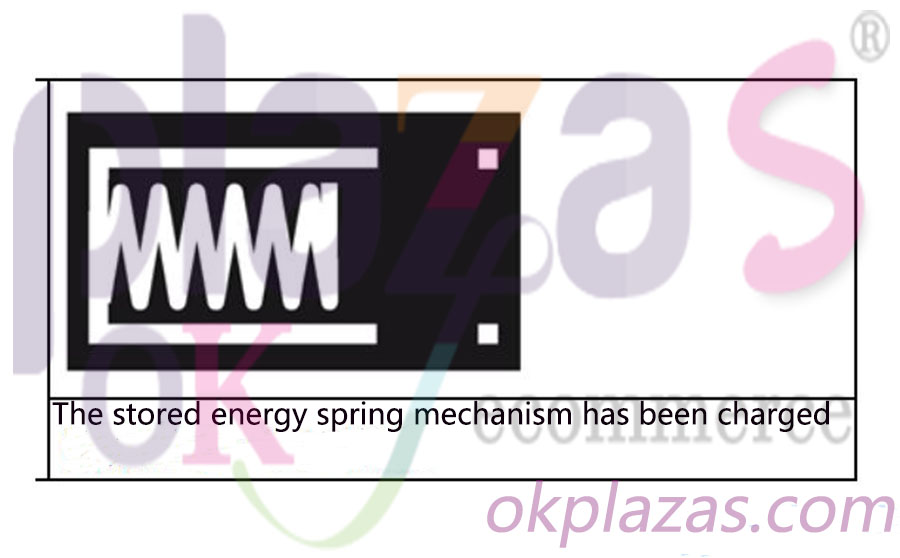
Note: To store energy in the energy storage spring mechanism, you should hold the energy storage rod firmly and shake it to the limit to ensure that each movement is as smooth as possible. When the Siemens circuit breaker 3WT stores energy for the fifth time, it must be as far and as smooth as the previous four operations, even if the force required to push the rod will increase significantly. After the energy storage spring mechanism is fully charged, the energy storage rod can move back and forth without resistance, as shown in the figure below.

Transmitter|Encoder|Soft starter|Power supply|VFD|Light curtain|Servo products|Human-machine interface|Solenoid valve|Cylinder|Actuator|Flow meter|Transformer|Thyristor|Sensor|Deceleration drive gearbox reducer|Linear guide|Circuit breaker|Refrigeration compressorAll industrial products of okplazas are purchased from the original factory or formal channels of agents to ensure the original authenticity, which perfectly solves the problem of industrial product sample procurement and small-batch procurement for the majority of engineers and purchasing personnel.

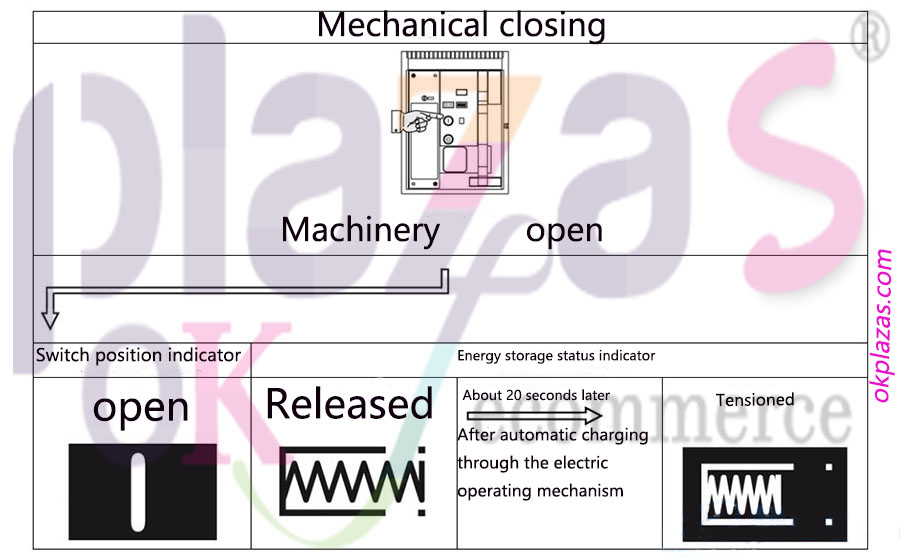
1.2. Energy storage through electric operating mechanism

When the control voltage is applied, this operation is automatically performed (the electric operating mechanism will be closed after the energy storage is completed), as shown in the figure below.

Transmitter|Encoder|Soft starter|Power supply|VFD|Light curtain|Servo products|Human-machine interface|Solenoid valve|Cylinder|Actuator|Flow meter|Transformer|Thyristor|Sensor|Deceleration drive gearbox reducer|Linear guide|Circuit breaker|Refrigeration compressorAll industrial products of okplazas are purchased from the original factory or formal channels of agents to ensure the original authenticity, which perfectly solves the problem of industrial product sample procurement and small-batch procurement for the majority of engineers and purchasing personnel.

2. Preparation before Siemens circuit breaker commissioning

2.1. Debugging checklist

The interrupter has been installed √

The circuit breaker is closed √

The overcurrent release has been installed and RESET√ is pressed

The response value on the overcurrent release has been set √

Auxiliary and control voltage has been applied (see nameplate for rated value) √

No current in main circuit√

The switch cabinet door is closed √

The stored energy spring mechanism has stored energy √

The withdrawable circuit breaker is in the connected position √

2.2. Conditions (according to version)

Undervoltage release, activated √

Shunt release, no excitation √

Electrical connection interlock, no excitation √

Mechanical reclose and interlock, set to RESET√

The electrical interlock of the closing coil has been cancelled √

Interlock, inactive √

Transmitter|Encoder|Soft starter|Power supply|VFD|Light curtain|Servo products|Human-machine interface|Solenoid valve|Cylinder|Actuator|Flow meter|Transformer|Thyristor|Sensor|Deceleration drive gearbox reducer|Linear guide|Circuit breaker|Refrigeration compressorAll industrial products of okplazas are purchased from the original factory or formal channels of agents to ensure the original authenticity, which perfectly solves the problem of industrial product sample procurement and small-batch procurement for the majority of engineers and purchasing personnel.

Note: 1. The Siemens circuit breaker can be closed only after the overcurrent release is installed (excluding non-automatic circuit breakers). 2. Do not disassemble the overcurrent release with a load, otherwise it will cause damage to the overcurrent release/current transformer.

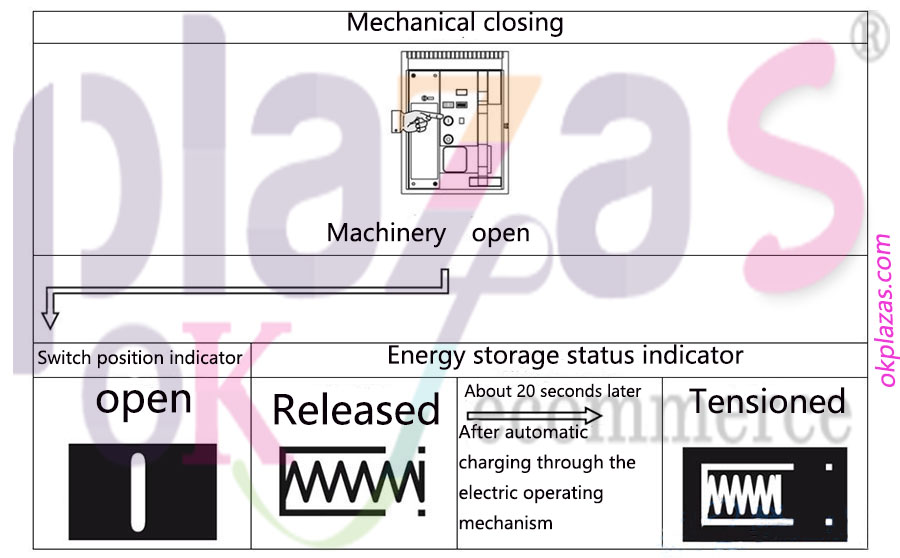
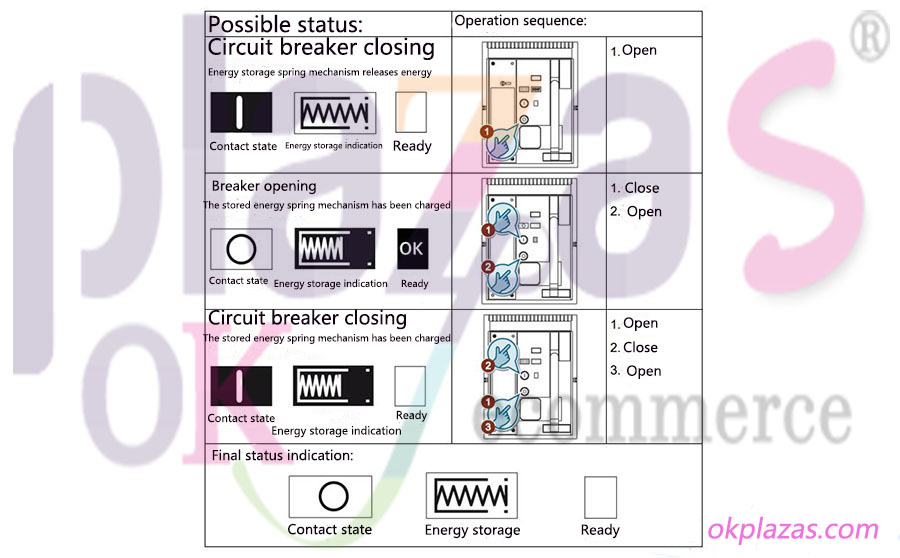
2.Commissioning of closing operation (as shown in the figure below)

3.Opening operation debugging (as shown in the figure below)

Transmitter|Encoder|Soft starter|Power supply|VFD|Light curtain|Servo products|Human-machine interface|Solenoid valve|Cylinder|Actuator|Flow meter|Transformer|Thyristor|Sensor|Deceleration drive gearbox reducer|Linear guide|Circuit breaker|Refrigeration compressorAll industrial products of okplazas are purchased from the original factory or formal channels of agents to ensure the original authenticity, which perfectly solves the problem of industrial product sample procurement and small-batch procurement for the majority of engineers and purchasing personnel.

4.Opening operation debugging (as shown in the figure below)

Transmitter|Encoder|Soft starter|Power supply|VFD|Light curtain|Servo products|Human-machine interface|Solenoid valve|Cylinder|Actuator|Flow meter|Transformer|Thyristor|Sensor|Deceleration drive gearbox reducer|Linear guide|Circuit breaker|Refrigeration compressorAll industrial products of okplazas are purchased from the original factory or formal channels of agents to ensure the original authenticity, which perfectly solves the problem of industrial product sample procurement and small-batch procurement for the majority of engineers and purchasing personnel.

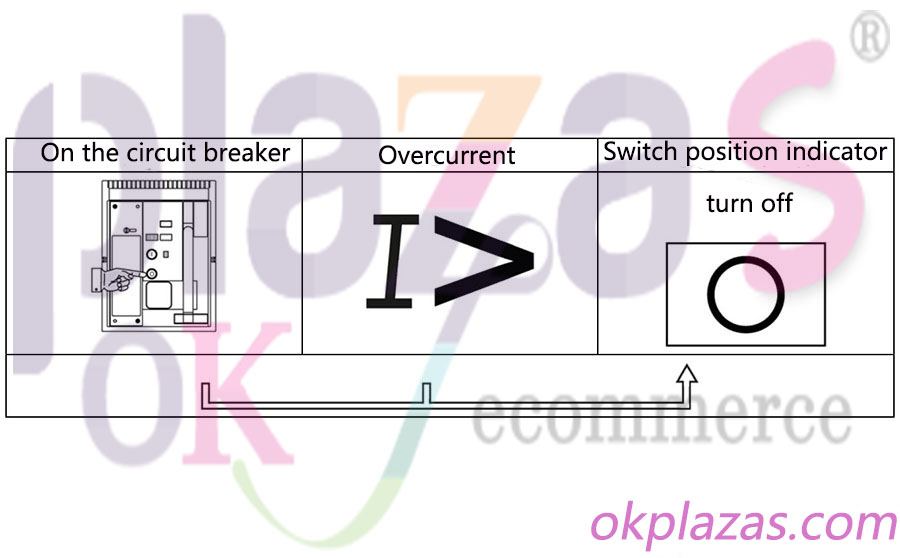
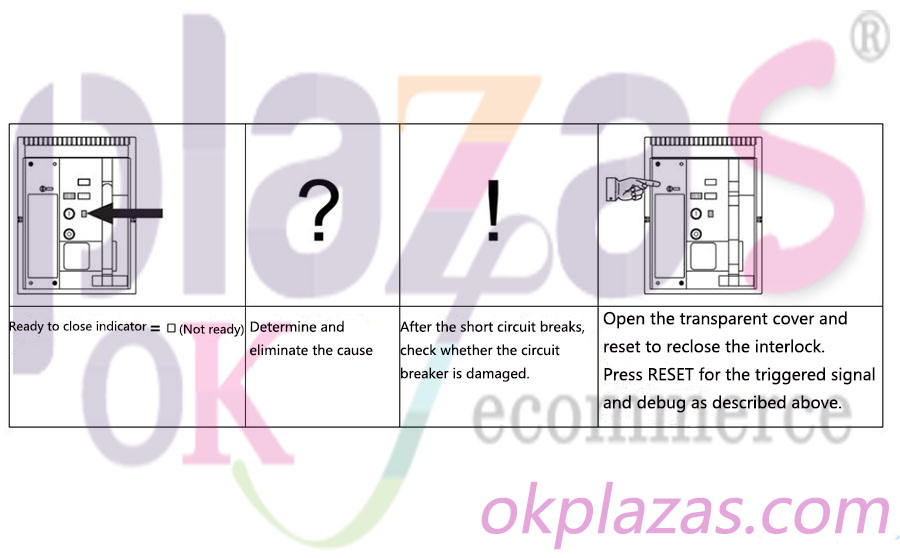
5.Debugging after overcurrent tripping (as shown in the figure below)

Transmitter|Encoder|Soft starter|Power supply|VFD|Light curtain|Servo products|Human-machine interface|Solenoid valve|Cylinder|Actuator|Flow meter|Transformer|Thyristor|Sensor|Deceleration drive gearbox reducer|Linear guide|Circuit breaker|Refrigeration compressorAll industrial products of okplazas are purchased from the original factory or formal channels of agents to ensure the original authenticity, which perfectly solves the problem of industrial product sample procurement and small-batch procurement for the majority of engineers and purchasing personnel.

Maintenance method of Siemens circuit breaker 3WT

Danger: Dangerous voltage, some circuit breaker components are under dangerous voltage or elastic force during operation. Contact with live components may result in death or serious injury. Only authorized personnel should perform maintenance.

1. Preparation

1.1.Open the circuit breaker and release the energy of the stored energy spring mechanism (as shown in the figure below)

Transmitter|Encoder|Soft starter|Power supply|VFD|Light curtain|Servo products|Human-machine interface|Solenoid valve|Cylinder|Actuator|Flow meter|Transformer|Thyristor|Sensor|Deceleration drive gearbox reducer|Linear guide|Circuit breaker|Refrigeration compressorAll industrial products of okplazas are purchased from the original factory or formal channels of agents to ensure the original authenticity, which perfectly solves the problem of industrial product sample procurement and small-batch procurement for the majority of engineers and purchasing personnel.

1.2. Disconnect the auxiliary circuit

1.2.1 Fixed circuit breaker (as shown in the figure below)

Transmitter|Encoder|Soft starter|Power supply|VFD|Light curtain|Servo products|Human-machine interface|Solenoid valve|Cylinder|Actuator|Flow meter|Transformer|Thyristor|Sensor|Deceleration drive gearbox reducer|Linear guide|Circuit breaker|Refrigeration compressorAll industrial products of okplazas are purchased from the original factory or formal channels of agents to ensure the original authenticity, which perfectly solves the problem of industrial product sample procurement and small-batch procurement for the majority of engineers and purchasing personnel.

Remove the manual connector and take out the Siemens circuit breaker. The manual connector can be removed by pushing up, making sure not to bend the connected wires.

1.2.2 Withdrawable circuit breaker (as shown in the figure below)

Transmitter|Encoder|Soft starter|Power supply|VFD|Light curtain|Servo products|Human-machine interface|Solenoid valve|Cylinder|Actuator|Flow meter|Transformer|Thyristor|Sensor|Deceleration drive gearbox reducer|Linear guide|Circuit breaker|Refrigeration compressorAll industrial products of okplazas are purchased from the original factory or formal channels of agents to ensure the original authenticity, which perfectly solves the problem of industrial product sample procurement and small-batch procurement for the majority of engineers and purchasing personnel.

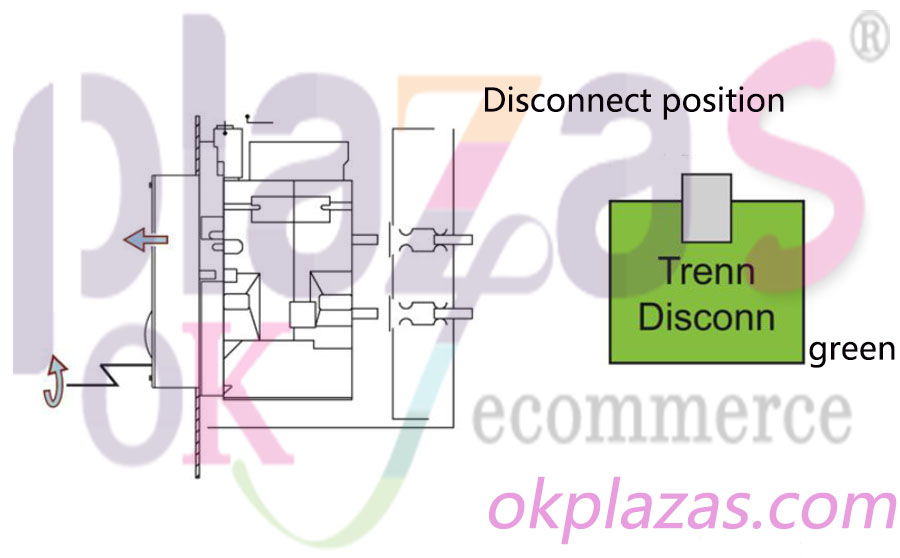
Push to the off position.

1.3 Pull the circuit breaker to the maintenance position and then remove it

Transmitter|Encoder|Soft starter|Power supply|VFD|Light curtain|Servo products|Human-machine interface|Solenoid valve|Cylinder|Actuator|Flow meter|Transformer|Thyristor|Sensor|Deceleration drive gearbox reducer|Linear guide|Circuit breaker|Refrigeration compressorAll industrial products of okplazas are purchased from the original factory or formal channels of agents to ensure the original authenticity, which perfectly solves the problem of industrial product sample procurement and small-batch procurement for the majority of engineers and purchasing personnel.

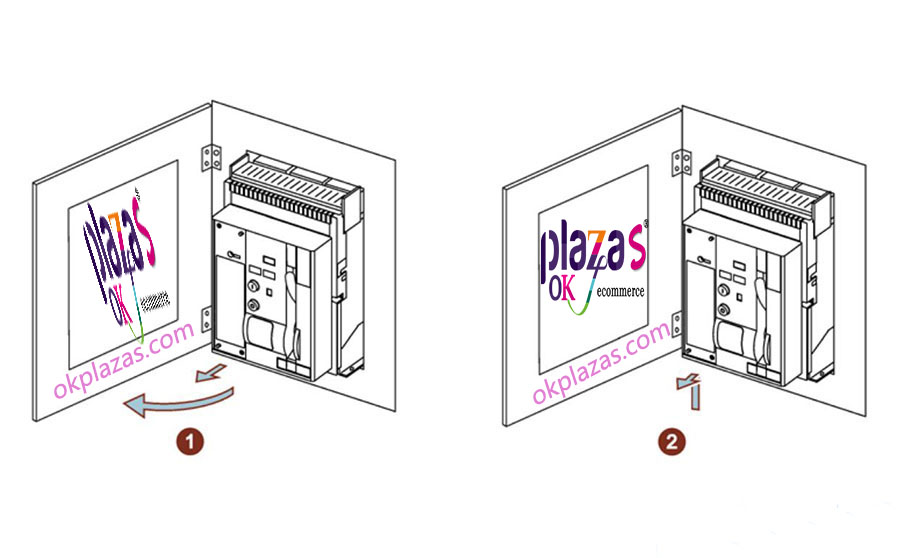
①Set the circuit breaker to the maintenance position;

②Remove the circuit breaker. Set the circuit breaker to the maintenance position and remove it from the system.

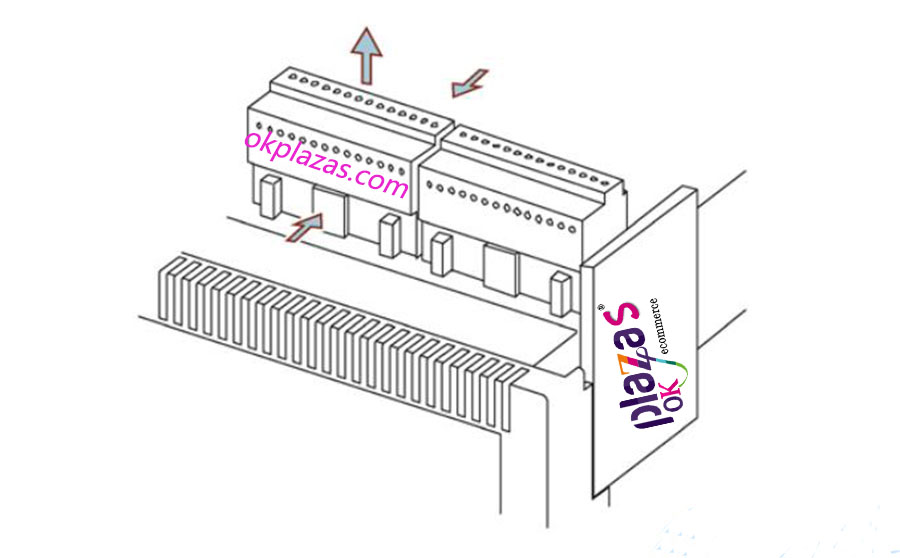
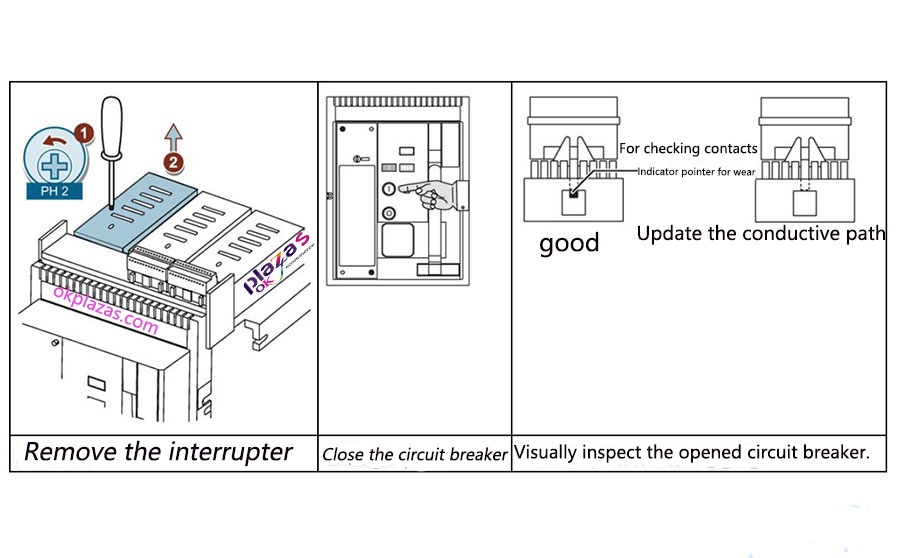
2. Check the interrupter

●Every 12 months or after 1000 switch operations; ●After severe shutdown. (As shown below)

Transmitter|Encoder|Soft starter|Power supply|VFD|Light curtain|Servo products|Human-machine interface|Solenoid valve|Cylinder|Actuator|Flow meter|Transformer|Thyristor|Sensor|Deceleration drive gearbox reducer|Linear guide|Circuit breaker|Refrigeration compressorAll industrial products of okplazas are purchased from the original factory or formal channels of agents to ensure the original authenticity, which perfectly solves the problem of industrial product sample procurement and small-batch procurement for the majority of engineers and purchasing personnel.

Remove the arc extinguishing chamber and replace the arc extinguishing chamber when it is severely worn/ruptured (for example, the arc splitter is broken).

3. Check the contact wear

●Every 12 months or after 1000 switch operations;

●After severe shutdown. (As shown below)

Transmitter|Encoder|Soft starter|Power supply|VFD|Light curtain|Servo products|Human-machine interface|Solenoid valve|Cylinder|Actuator|Flow meter|Transformer|Thyristor|Sensor|Deceleration drive gearbox reducer|Linear guide|Circuit breaker|Refrigeration compressorAll industrial products of okplazas are purchased from the original factory or formal channels of agents to ensure the original authenticity, which perfectly solves the problem of industrial product sample procurement and small-batch procurement for the majority of engineers and purchasing personnel.

4. Replace the Siemens circuit breaker 3WT conductive circuit

Danger: Dangerous voltage! Dangerous energy storage spring mechanism. Before starting work, disconnect the equipment from the power supply and ensure that it will not be connected. Only when the circuit breaker is opened and the energy storage spring mechanism is discharged, can you perform operations on the device. Otherwise, it may cause death, serious bodily injury and major property damage, and only authorized personnel can install the device.

4.1. Check the contents of the package

Transmitter|Encoder|Soft starter|Power supply|VFD|Light curtain|Servo products|Human-machine interface|Solenoid valve|Cylinder|Actuator|Flow meter|Transformer|Thyristor|Sensor|Deceleration drive gearbox reducer|Linear guide|Circuit breaker|Refrigeration compressorAll industrial products of okplazas are purchased from the original factory or formal channels of agents to ensure the original authenticity, which perfectly solves the problem of industrial product sample procurement and small-batch procurement for the majority of engineers and purchasing personnel.

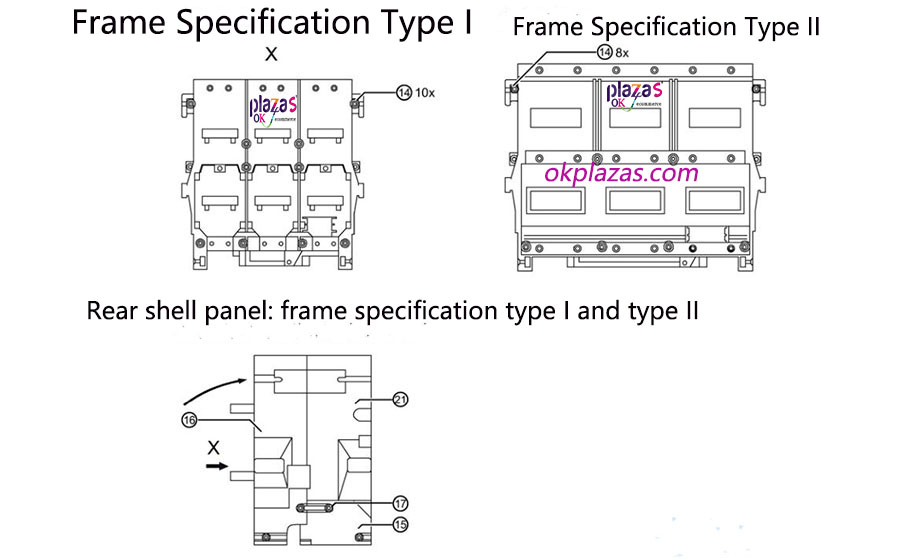
4.1.1. Frame Specification Type I:

①Contact support component 1x;

②Conducting path, fixed 1x;

③Connecting bolt 1x;

④Cylinder head screw M6 x 30 DIN912 4x;

⑤Strain washer 6DIN 6796 4x.

4.1.2. Frame Specification Type II:

⑥Contact support component 1x;

⑦Conducting path, fixed 1x;

⑧Connecting bolt 1x;

Cylinder head screw M8 x 50 DIN912 4x;

⑩Strain washer 8DIN 6796 4x.

Note: The shape of the contact support components ① and ⑥ and the conductive path ② and ⑦ of the connecting copper sheet varies according to the model, and the installation process is the same for all models.

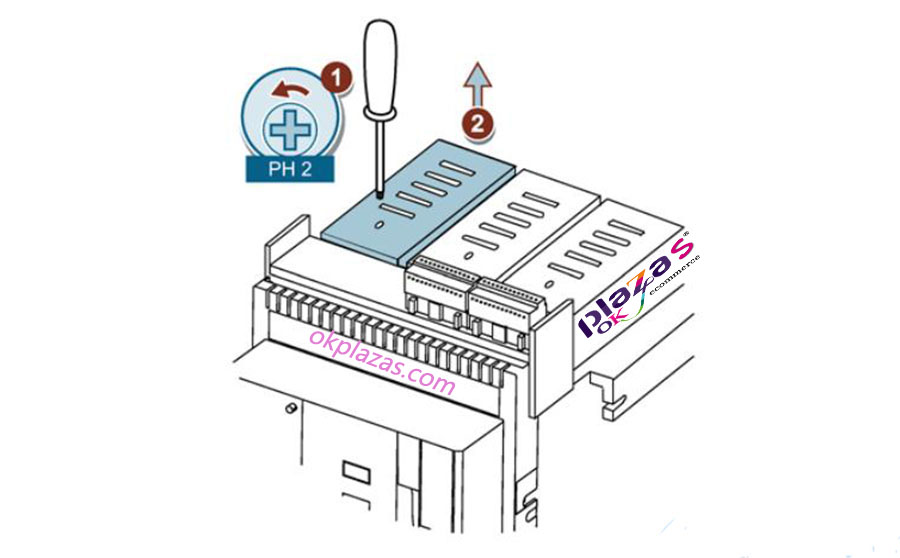
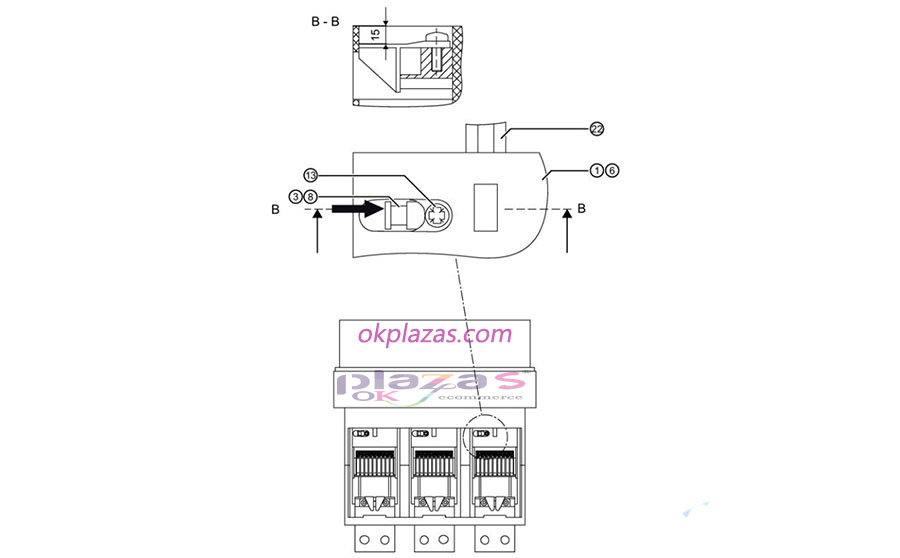
4.2. Loosen the interrupter

Transmitter|Encoder|Soft starter|Power supply|VFD|Light curtain|Servo products|Human-machine interface|Solenoid valve|Cylinder|Actuator|Flow meter|Transformer|Thyristor|Sensor|Deceleration drive gearbox reducer|Linear guide|Circuit breaker|Refrigeration compressorAll industrial products of okplazas are purchased from the original factory or formal channels of agents to ensure the original authenticity, which perfectly solves the problem of industrial product sample procurement and small-batch procurement for the majority of engineers and purchasing personnel.

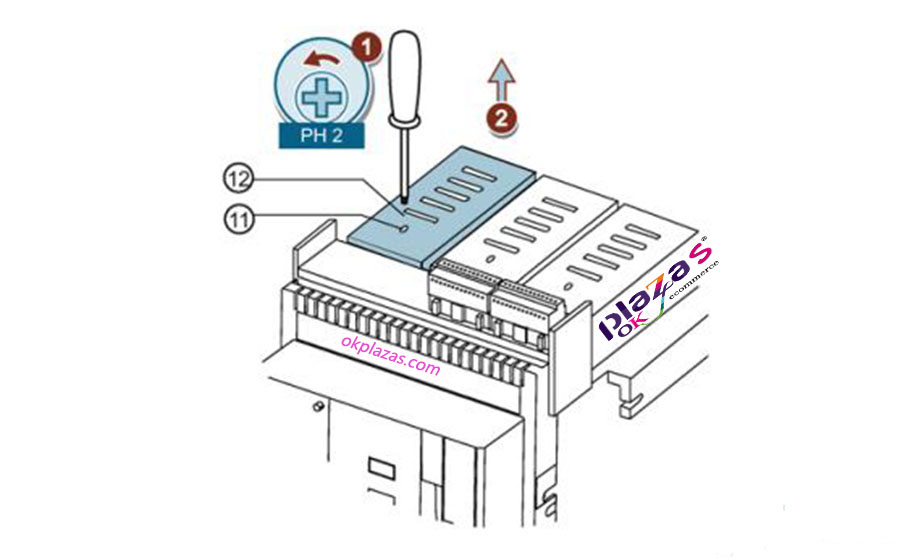
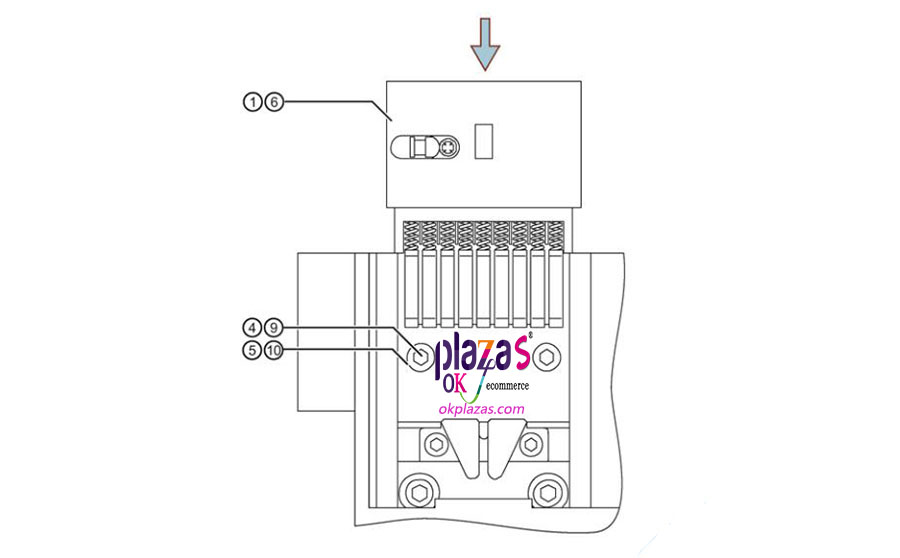
Unscrew the fastening bolt 11 of the arc extinguishing chamber 12, and remove the arc extinguishing chamber.

4.3. Separate contact support (Siemens circuit breaker frame specification type I and type II)

Transmitter|Encoder|Soft starter|Power supply|VFD|Light curtain|Servo products|Human-machine interface|Solenoid valve|Cylinder|Actuator|Flow meter|Transformer|Thyristor|Sensor|Deceleration drive gearbox reducer|Linear guide|Circuit breaker|Refrigeration compressorAll industrial products of okplazas are purchased from the original factory or formal channels of agents to ensure the original authenticity, which perfectly solves the problem of industrial product sample procurement and small-batch procurement for the majority of engineers and purchasing personnel.

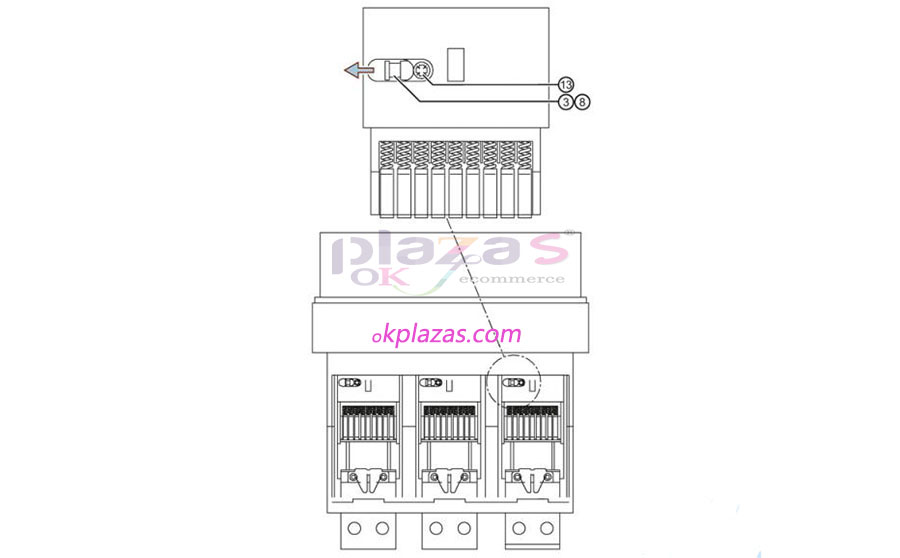
Loosen the locking bolt 13 (not completely unscrewed), and use a screwdriver to take out the connecting bolt 3 or 8 (as shown in the figure above).

Note: For the circuit breaker frame specification type II, the locking bolt 13 with the cover must be completely removed.

4.4. Remove the rear shell panel of the circuit breaker

Transmitter|Encoder|Soft starter|Power supply|VFD|Light curtain|Servo products|Human-machine interface|Solenoid valve|Cylinder|Actuator|Flow meter|Transformer|Thyristor|Sensor|Deceleration drive gearbox reducer|Linear guide|Circuit breaker|Refrigeration compressorAll industrial products of okplazas are purchased from the original factory or formal channels of agents to ensure the original authenticity, which perfectly solves the problem of industrial product sample procurement and small-batch procurement for the majority of engineers and purchasing personnel.

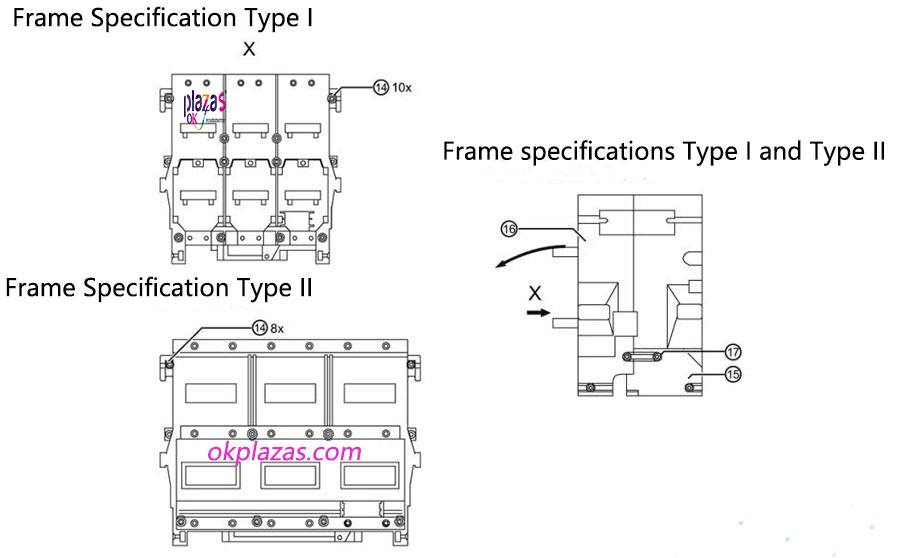
Remove the cylinder head screw 14 and unscrew the countersunk screw 17 on the support bracket 15 of the rear panel 16. Loosen the countersunk screws 17 of the support bracket 15 (not completely unscrewed), and open the rear panel 16 of the circuit breaker (as shown in the figure above).

4.5. Remove the insulating cover (frame specification type I)

Transmitter|Encoder|Soft starter|Power supply|VFD|Light curtain|Servo products|Human-machine interface|Solenoid valve|Cylinder|Actuator|Flow meter|Transformer|Thyristor|Sensor|Deceleration drive gearbox reducer|Linear guide|Circuit breaker|Refrigeration compressorAll industrial products of okplazas are purchased from the original factory or formal channels of agents to ensure the original authenticity, which perfectly solves the problem of industrial product sample procurement and small-batch procurement for the majority of engineers and purchasing personnel.

Lift the contact holder 1, and pull out the insulating cover 18 forward (squeeze the side of the insulating cover 18 outward slightly).

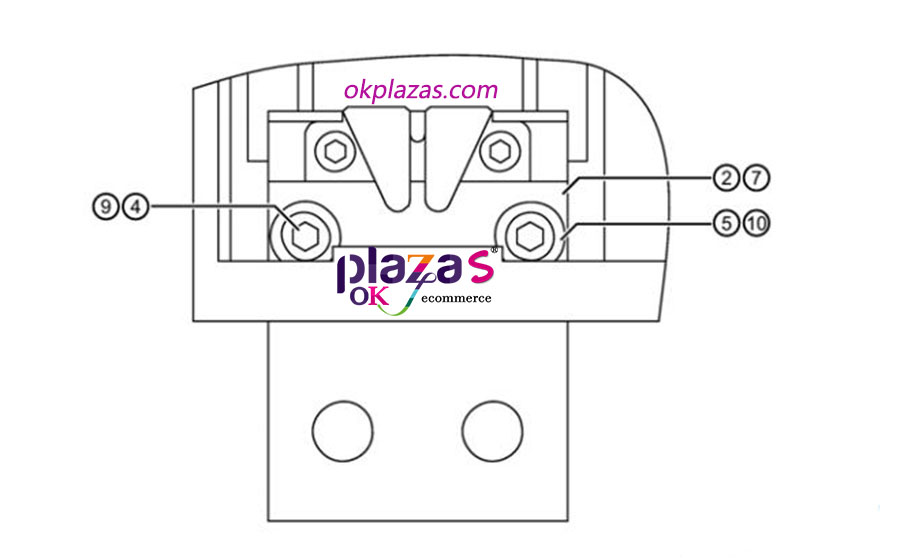
4.6. Remove the contact bracket (frame specification type I and type II)

Transmitter|Encoder|Soft starter|Power supply|VFD|Light curtain|Servo products|Human-machine interface|Solenoid valve|Cylinder|Actuator|Flow meter|Transformer|Thyristor|Sensor|Deceleration drive gearbox reducer|Linear guide|Circuit breaker|Refrigeration compressorAll industrial products of okplazas are purchased from the original factory or formal channels of agents to ensure the original authenticity, which perfectly solves the problem of industrial product sample procurement and small-batch procurement for the majority of engineers and purchasing personnel.

Lift the contact bracket 1 or 6, and unscrew the cylinder head screws 4 or 9 with strain washers 5 or 10. Remove the contact holder 1 or 6 from the rear housing panel 16 as shown in the figure above.

4.7. Remove the conductive path (frame specification type I and type II)

Transmitter|Encoder|Soft starter|Power supply|VFD|Light curtain|Servo products|Human-machine interface|Solenoid valve|Cylinder|Actuator|Flow meter|Transformer|Thyristor|Sensor|Deceleration drive gearbox reducer|Linear guide|Circuit breaker|Refrigeration compressorAll industrial products of okplazas are purchased from the original factory or formal channels of agents to ensure the original authenticity, which perfectly solves the problem of industrial product sample procurement and small-batch procurement for the majority of engineers and purchasing personnel.

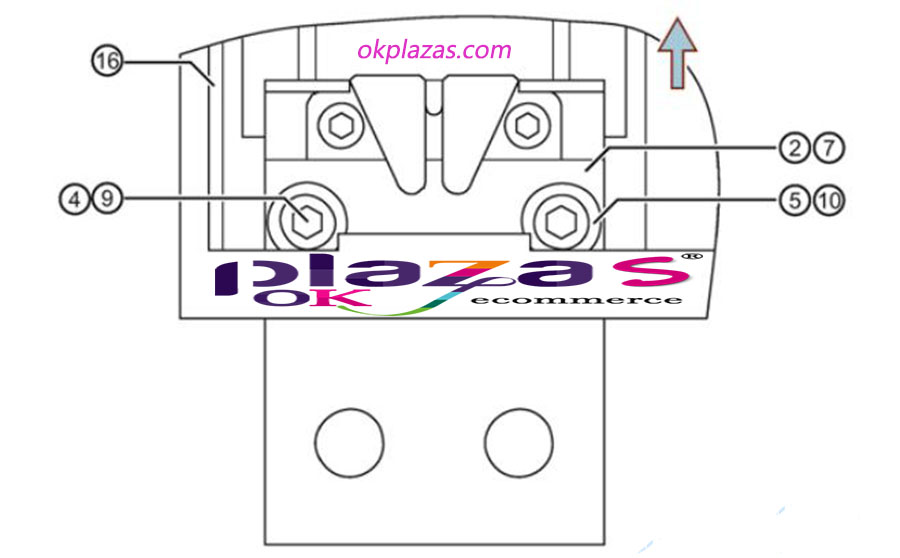
Unscrew the cylinder head screws 4 or 9 with strain washers 5 or 10, and remove the conductive paths 2 or 7 from the rear housing panel 16 as shown in the figure above.

4.8. Install the conductive path of Siemens circuit breaker (frame specification type I and type II)

Transmitter|Encoder|Soft starter|Power supply|VFD|Light curtain|Servo products|Human-machine interface|Solenoid valve|Cylinder|Actuator|Flow meter|Transformer|Thyristor|Sensor|Deceleration drive gearbox reducer|Linear guide|Circuit breaker|Refrigeration compressorAll industrial products of okplazas are purchased from the original factory or formal channels of agents to ensure the original authenticity, which perfectly solves the problem of industrial product sample procurement and small-batch procurement for the majority of engineers and purchasing personnel.

Push the conductive path 2 or 7 into the rear housing panel 16 from above, and push the spacer, 19 or 20 into the rear housing panel 16 from below, as far as possible. Use cylinder head screws 4 or 9 and strain washers 5 or 10 to fix conductive paths 2 or 7 and spacers 19 or 20 to the rear housing panel 16 (tighten by hand).

Note: Models other than 3WT9821-0AA00 do not require spacers (19 or 20).

4.9. Place the spacer (frame specification type I)

Transmitter|Encoder|Soft starter|Power supply|VFD|Light curtain|Servo products|Human-machine interface|Solenoid valve|Cylinder|Actuator|Flow meter|Transformer|Thyristor|Sensor|Deceleration drive gearbox reducer|Linear guide|Circuit breaker|Refrigeration compressorAll industrial products of okplazas are purchased from the original factory or formal channels of agents to ensure the original authenticity, which perfectly solves the problem of industrial product sample procurement and small-batch procurement for the majority of engineers and purchasing personnel.

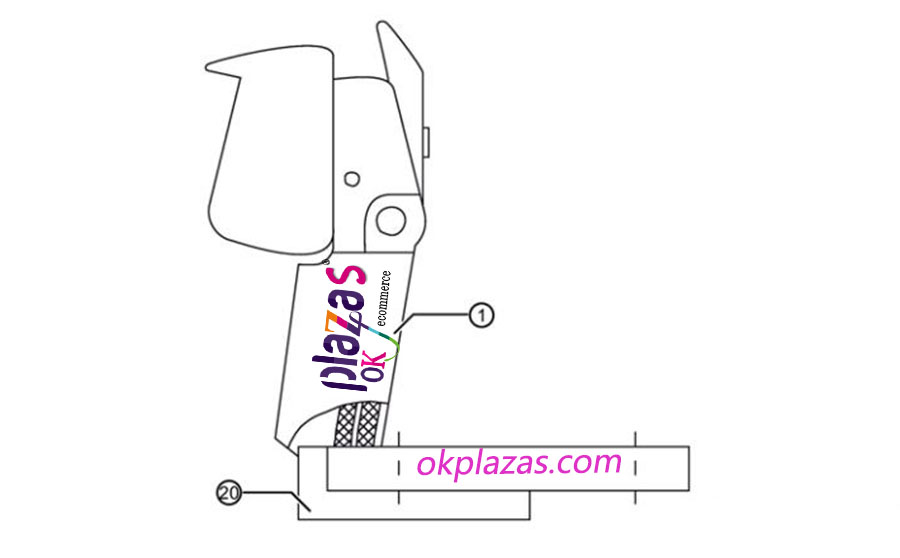
Place the spacer block 20 on the contact holder 1 as shown in the above figure.

Note: Models other than 3WT9821-0AA00 do not require spacer 20.

5.0. Install the contact bracket (frame specification type I and type II)

Transmitter|Encoder|Soft starter|Power supply|VFD|Light curtain|Servo products|Human-machine interface|Solenoid valve|Cylinder|Actuator|Flow meter|Transformer|Thyristor|Sensor|Deceleration drive gearbox reducer|Linear guide|Circuit breaker|Refrigeration compressorAll industrial products of okplazas are purchased from the original factory or formal channels of agents to ensure the original authenticity, which perfectly solves the problem of industrial product sample procurement and small-batch procurement for the majority of engineers and purchasing personnel.

Insert the contact bracket 1 or 6 (with the spacer 20 if necessary) into the rear housing panel 16, and use the cylinder head screws 4 or 9 and strain washers 5 or 10 to fix (tightening torque: 8±1Nm 4; 12± 1Nm 9).

5.1.Install 3WT insulation cover of Siemens circuit breaker (frame specification type I)

Transmitter|Encoder|Soft starter|Power supply|VFD|Light curtain|Servo products|Human-machine interface|Solenoid valve|Cylinder|Actuator|Flow meter|Transformer|Thyristor|Sensor|Deceleration drive gearbox reducer|Linear guide|Circuit breaker|Refrigeration compressorAll industrial products of okplazas are purchased from the original factory or formal channels of agents to ensure the original authenticity, which perfectly solves the problem of industrial product sample procurement and small-batch procurement for the majority of engineers and purchasing personnel.

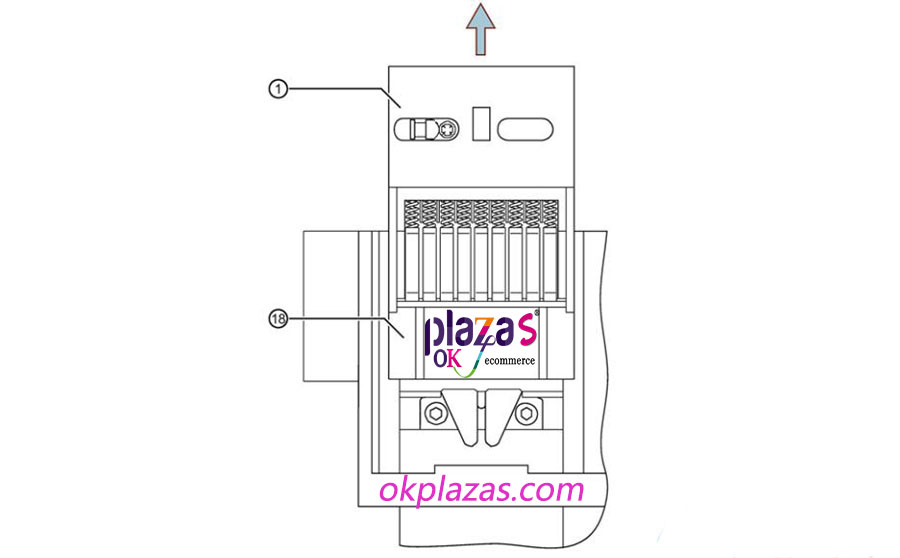
Lift the contact holder 1, and insert the insulating cover 18 on the contact holder 1 (must be able to hear the meshing sound).

5.2.Remove the rear shell panel

Transmitter|Encoder|Soft starter|Power supply|VFD|Light curtain|Servo products|Human-machine interface|Solenoid valve|Cylinder|Actuator|Flow meter|Transformer|Thyristor|Sensor|Deceleration drive gearbox reducer|Linear guide|Circuit breaker|Refrigeration compressorAll industrial products of okplazas are purchased from the original factory or formal channels of agents to ensure the original authenticity, which perfectly solves the problem of industrial product sample procurement and small-batch procurement for the majority of engineers and purchasing personnel.

Place the rear housing panel 16 up against the housing. When performing this operation, make sure not to pinch any cables. Use countersunk screws 17 to fix the support bracket 15 and the housing or rear housing panel 16 (tightening torque: 6±1 Nm), and fix the cylinder head screws 15 (tightening torque: 10±1 Nm).

5.3.Connecting contact bracket (frame specification type I and type II)

Transmitter|Encoder|Soft starter|Power supply|VFD|Light curtain|Servo products|Human-machine interface|Solenoid valve|Cylinder|Actuator|Flow meter|Transformer|Thyristor|Sensor|Deceleration drive gearbox reducer|Linear guide|Circuit breaker|Refrigeration compressorAll industrial products of okplazas are purchased from the original factory or formal channels of agents to ensure the original authenticity, which perfectly solves the problem of industrial product sample procurement and small-batch procurement for the majority of engineers and purchasing personnel.

Squeeze the contact holder 1 or 6 in the direction of the connecting clamp as shown in the figure above. When performing this operation, make sure that the connecting clamp is fully adapted to the contact holder 1 or 6. Use a screwdriver to insert the connecting bolt 3 or 8 to the right as shown in the figure, and fix the connecting bolt 3 or 8 with the locking bolt 13 (tightening torque: 2±0.3Nm).

Note: For Siemens circuit breaker frame specification II type starting from 09/95, the locking screw 13 with outer cover must be screwed in again (tightening torque: 2±0.3Nm).

5.4.Final installation of conductive path (frame specification type I and type II)

Transmitter|Encoder|Soft starter|Power supply|VFD|Light curtain|Servo products|Human-machine interface|Solenoid valve|Cylinder|Actuator|Flow meter|Transformer|Thyristor|Sensor|Deceleration drive gearbox reducer|Linear guide|Circuit breaker|Refrigeration compressorAll industrial products of okplazas are purchased from the original factory or formal channels of agents to ensure the original authenticity, which perfectly solves the problem of industrial product sample procurement and small-batch procurement for the majority of engineers and purchasing personnel.

Caution: Dangerous stored energy spring mechanism.

The stored energy spring mechanism is charged and the Siemens circuit breaker is closed. Close the circuit breaker, making sure to take the necessary precautions. Use washers 5 or 10 to fix the cylinder head screws 4 or 9 (tightening torque: frame size I type 8 ± 1 Nm, frame size II type 12 ± 1 Nm).

5.5.Insert the interrupter

Transmitter|Encoder|Soft starter|Power supply|VFD|Light curtain|Servo products|Human-machine interface|Solenoid valve|Cylinder|Actuator|Flow meter|Transformer|Thyristor|Sensor|Deceleration drive gearbox reducer|Linear guide|Circuit breaker|Refrigeration compressorAll industrial products of okplazas are purchased from the original factory or formal channels of agents to ensure the original authenticity, which perfectly solves the problem of industrial product sample procurement and small-batch procurement for the majority of engineers and purchasing personnel.

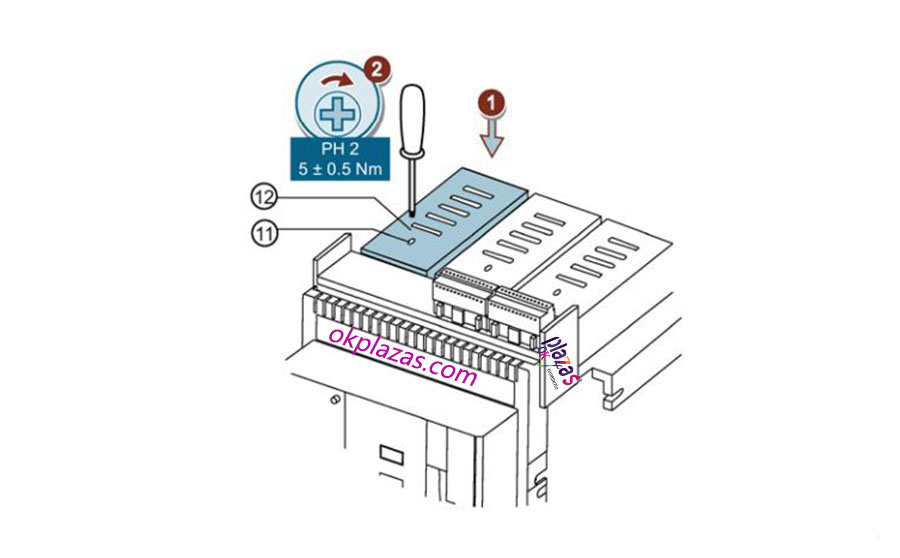
Insert the arc extinguishing chamber 12, and use the fastening screw 11 to fasten the arc extinguishing chamber 12.

5.6. Functional test

The mechanical function test of the Siemens circuit breaker is to manually charge the stored energy spring mechanism. Close and open the circuit breaker, and recheck the contact wear indicator.

okplazas.com Electromechanical Mall is a professional agent for sales of Siemens products. Welcome to e-mail: [email protected] for consultation. You can also contact WeChat customer service online at +86 13689242098 for product consultation!