Detailed video HD encoder connection configuration IP network practical operation tutorial
Detailed video HD encoder connection configuration IP network practical operation tutorial
Detailed video HD encoder connection configuration IP network practical operation tutorial
Video high-definition encoders are mainly used for video transmission compression hardware devices. As audio and video IP-based transmission applications become more widely used, many times users get the video encoder box and do not know how to use and configure to connect to the IP network? The following will explain in detail the actual operation tutorial of the video HD encoder connection configuration IP network:
1.Prepare and record an IP address for the encoder to connect to the external network
Before configuring the encoder, you need to prepare an available IP address for the encoder. If you are using DHCP, you can skip this step. Or consult the network administrator, assign a usable IP address and gateway from the actual application network, and record it, and then manually specify the IP address for the encoder; or independently find the available IP address through the following method: Click When the computer system is running, enter "cmd" to enter the command line, and output "ipconfig" in the command line to view the current network IP address segment and gateway.
For example: here is the 192.168.4.* network segment and the gateway is 192.168.4.1. Then we enter the ping command on the command line to find an unused IP address under the same network segment. For example, ping 192.168.4.212, when the target host cannot be accessed, it means that the IP address is available, and then our IP address and gateway are recorded.
2. Connect the camera and encoder with network cable
Connect the camera to the encoder, and connect the encoder network cable directly to the computer and start it up.
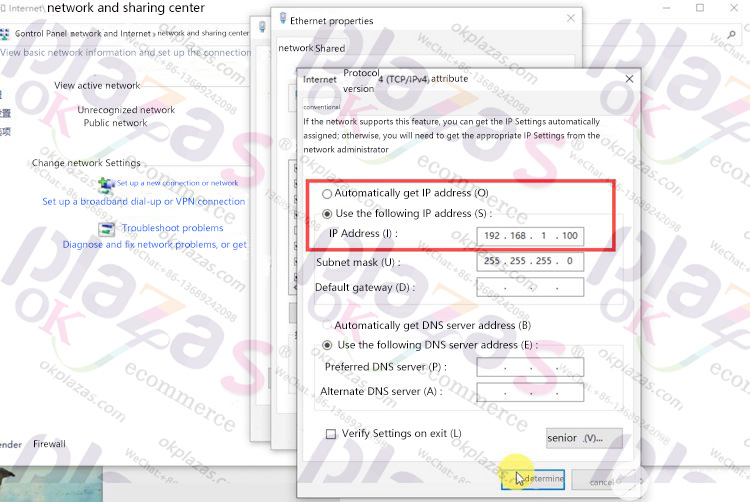
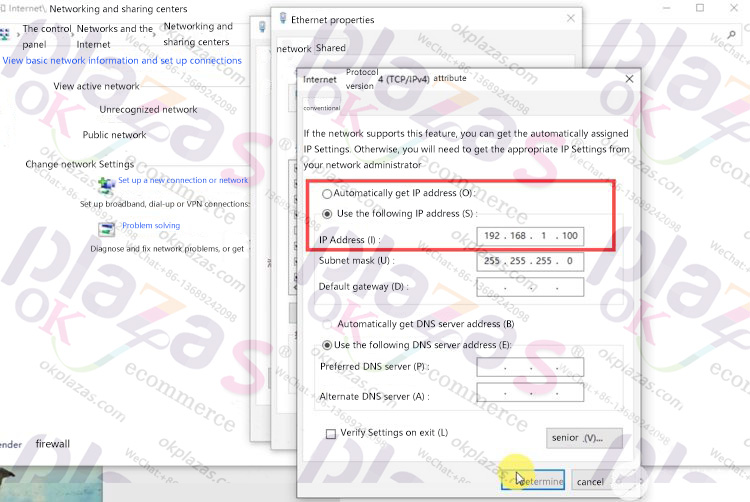
3. Configure the computer IP in the same network segment
The factory default IP address of the encoder is 192.168.1.168. You need to set the computer IP to an IP address in the same network segment to log in to the encoder (such as 192.168.1.100.) Turn on the computer, right-click the "Network Connections" icon in the taskbar, and click Open "Network and Sharing Center", find the Intrenet protocol version 4 on the Ethernet or local connection, and configure the IP. After the configuration is completed, save and log in to the encoder WEB background management page.
4. Log in to the encoder background and configure related parameters
1)Log in to the encoder background to confirm whether the video source is normally connected. The default account and password of the encoder is "admin". Enter the encoder background to confirm whether the video source is normally connected. Check the preview box at the Motion-JPEG stream. The dynamic change of the frame indicates that the image input is normal, blue screen or still, please check whether the video port interface is loose or whether the video source is normal.
2) Configure code rate and resolution
Encoder information board interface, enter "encoding and media stream", click "encoding and stream parameter settings", click settings under H.264 main stream to enter encoding parameter configuration, you can set the encoder's bit rate and resolution parameters . For example: the viewing terminal is a mobile phone terminal: the resolution can be configured to 720 or lower as required, the frame rate can be set to 30 frames, and the bit rate configuration is about 1.5. We can keep the default for others. You can also set a higher resolution and coding rate according to the network or the requirements for image quality. The viewing end is a large screen or a computer end: we can set a resolution of 1080 and a frame rate of 60, and the bit rate is set to 2M or higher.
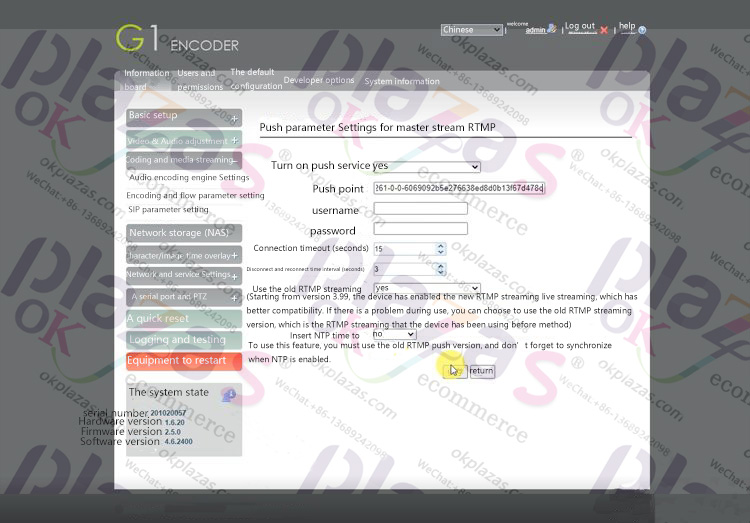
3) Configure the streaming address
Enter "Encoding and Media Streaming", click "Encoding and Streaming Parameter Settings", take RTMP live streaming as an example, add a streaming service under the H.264 main stream, select RTMP streaming, and click the setting button corresponding to RTMP after adding Enter the push streaming configuration page. After adding, enter the RTMP push stream configuration page, fill in the RTMP push stream address of the live broadcast platform in the push point column, save the configuration, and finally start the push service. Note: The RTMP format is rtmp address/live code. The RTMP address and live code are used/separated and filled in the push point column uniformly. RTMP push addresses and live codes of some platforms have been merged together, just copy and paste directly into the push box. can.
4) Configure the Internet IP address
According to the actual application and product model, select one of the encoder network configuration. Note: When multiple networks are configured and connected at the same time, the encoder uses the wired network first, followed by WiFi.
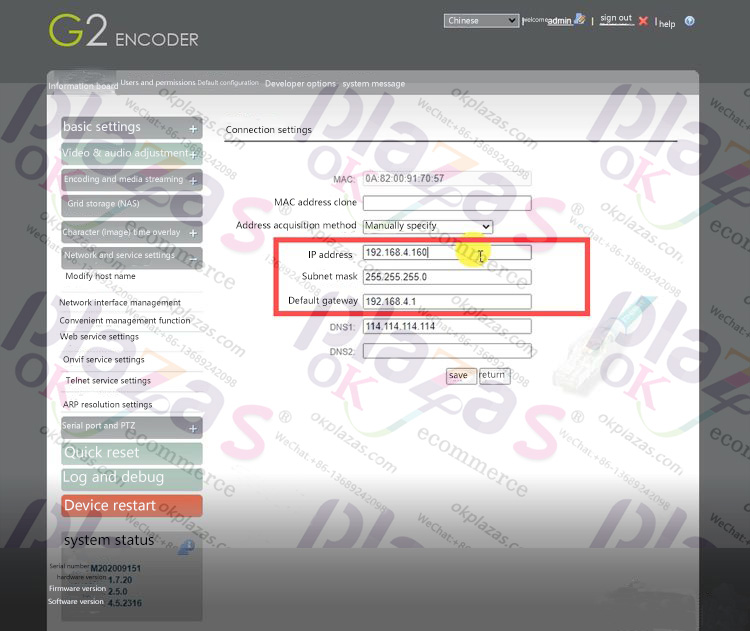
Configure the wired network IP address
Enter "Network and Service Settings", click "Network and Interface Management", enter the wired network configuration interface, select the address manually specified, and fill in the IP address and gateway with the values recorded in step one. Fill in 255.255.255.0 for subnet and 114.114.114.114 for DNS. Note: The encoder is in DHCP mode by default. If your network is DHCP and you need to use DHCP, you can keep the original settings unchanged.
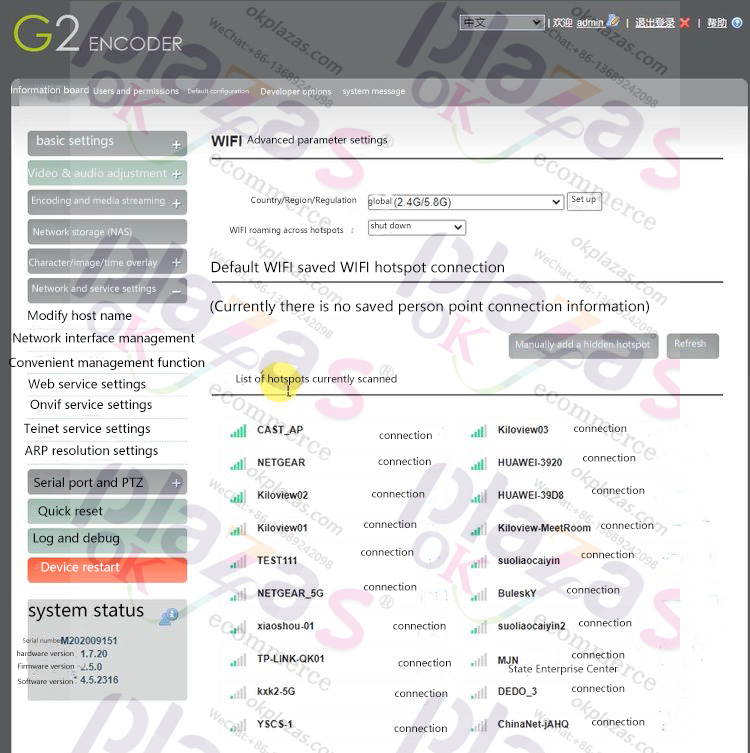
Configure WiFi network
Also under the WiFi column of the "Network and Interface Management" interface, click the wireless configuration page of the default WiFi, find the name of the WiFi that needs to be connected in the currently scanned hotspot, click to enter and enter the wireless password, and the address acquisition method is selected as manually specified (same as above One step), or DHCP is automatically obtained, click Save. Note: For other settings not mentioned, keep the default parameters. If you need other function configuration, please read the "Product Specification" in detail, or consult technical support.
After completing the encoder parameters and network configuration, disconnect the network cable that connects the encoder directly to the computer and connect it to the actual application network. At this time, the encoder can connect to the Internet and you can watch the live broadcast on the live broadcast client.
Log in again to manage the encoder
If the IP address currently used by the encoder is manually specified, you can log in to the IP address directly on the computer in the same LAN to enter the device management background for parameter configuration; if you set DHCP to automatically obtain an IP address, you can log in by referring to step three The default IP address of the encoder, or use the following method to get the current IP address of the encoder: Method 1: You can log in to the router of the network to check the IP of the access device to find the IP belonging to the encoder. Method 2: The encoder has ONVIF turned on by default. You can install ONVIF Device Manager on your computer. After opening it, you can search for all ONVIFs under the current network segment, and you can find the IP address and information of the device.
-
The principle and application field of Autonics panel products (handling)
 June 12, 2021
 -
New product launch SRH1 series single-phase SSR with integrated heat sink
 June 12, 2021
 -
New product launch SRH1 series single-phase SSR with integrated heat sink
 June 12, 2021
 -
Otto protection grade IP69K new product launched Ø18mm cylindrical (SUS316L housing) photoelectric sensor BRQT series
 June 12, 2021
 -
Autonics adds shading motion mode sensor
 June 12, 2021