Introduction to the installation and connection of Siemens circuit breaker 3WT
Introduction to the installation and connection of Siemens circuit breaker 3WT
Introduction to the installation and connection of Siemens circuit breaker 3WT
Siemens circuit breaker 3WT installation method
Warning: Before installing the equipment, make sure that the minimum spacing requirements between insulating, grounding and conductive components are met in the switch cabinet.
1. Installation location
Warning: The Siemens circuit breaker is installed obliquely. When it is moved into the off position, the circuit breaker may slide out of the guide rail.
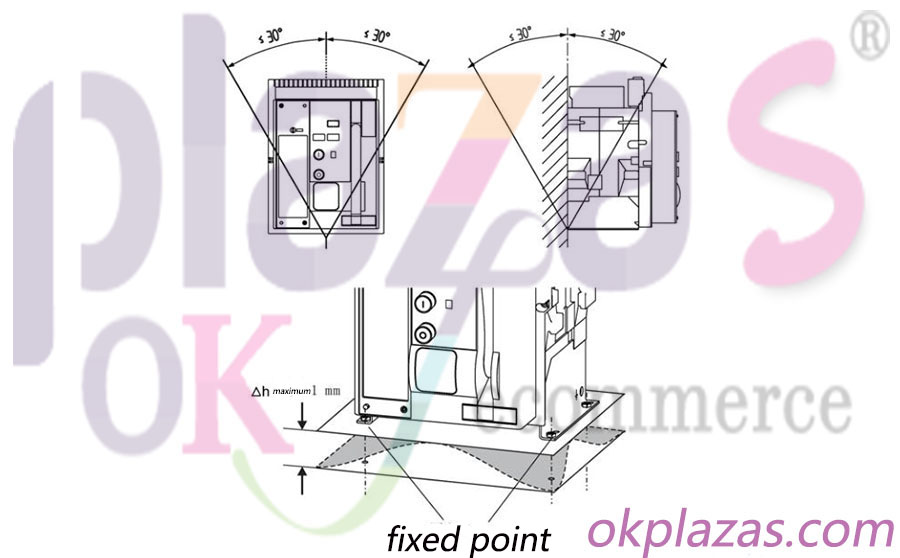
2. Install on a horizontal surface
2.1. For fixed circuit breakers:

Fixed base plate: 4 M8-8.8 screws + nuts + washers.
3. Arc extinguishing chamber cover
If multiple 3WT withdrawable Siemens circuit breakers are arranged vertically in a control cabinet without a compartment base, it is recommended to use an interrupter cover.
Siemens circuit breaker 3WT shake in and shake out
Note: Only when the operation panel has been installed and tightened, can the breaker be moved in. If a safety baffle is installed, do not change the direction when the Siemens circuit breaker does not reach the specified position (disconnect/test/connect position) during the cranking process.
Note: The position indicator of the circuit breaker does not provide position locking, and the position can only be checked through the indicator on the circuit breaker.
1.Shake out operation (as shown below)
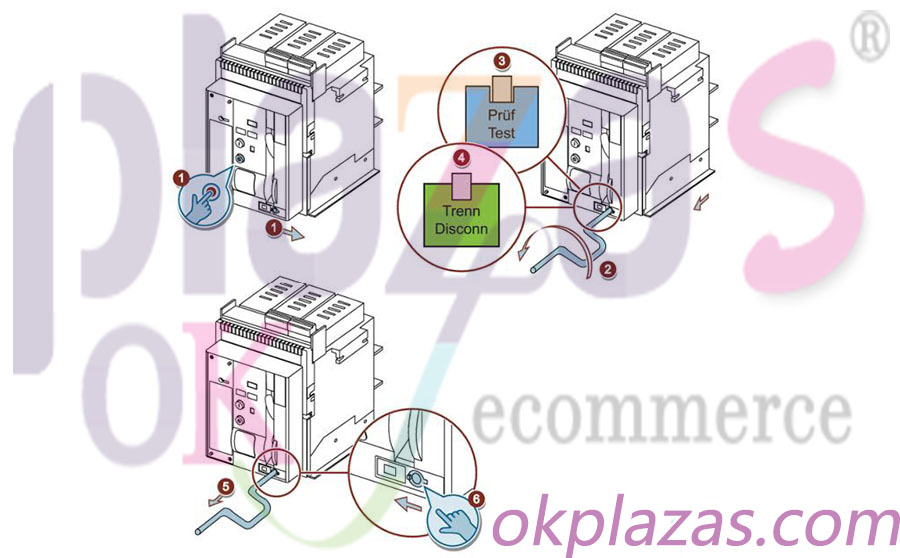
Note:
①Press the "OFF" button and open the sliding window at the same time;
②Insert the crank to shake the hand, and then shake it out;
③Shake to the test position;
④ Shake to the off position;
⑤Remove the crank and shake the hand;
⑥Close the sliding window.
2.Shake in operation (as shown below)
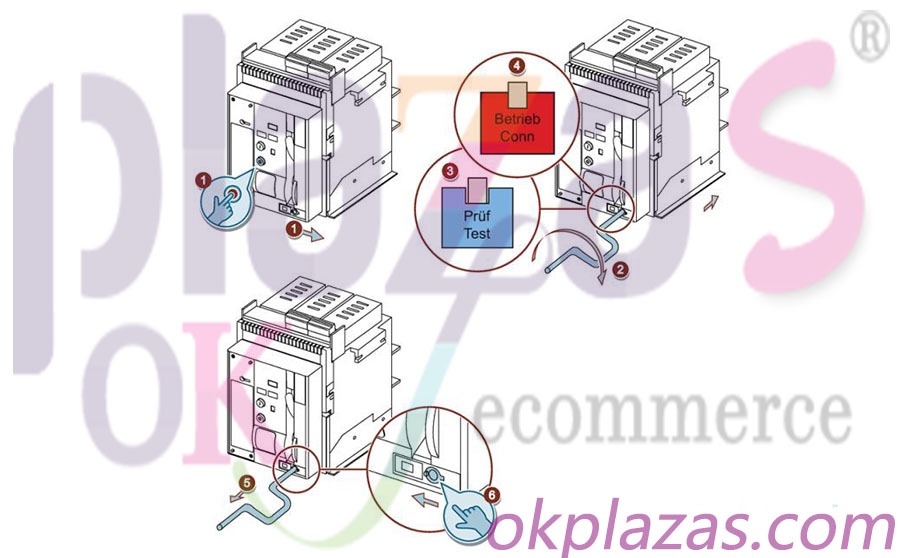
Note:
①Press the "OFF" button and open the sliding window at the same time;
②Insert the crank to shake the hand, and then shake it in;
③Shake to the test position;
④ Shake to the connecting position;
⑤Remove the crank and shake the hand;
⑥Close the sliding window.
3.Fixed crank rocker
①Fix the bracket, ②Fix the crank.
Note: The crank can also be fixed on the right side.
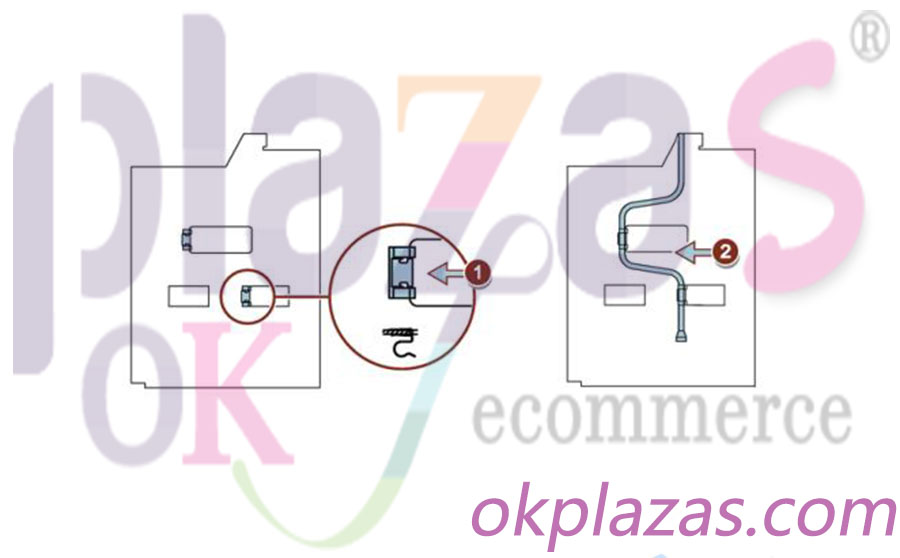
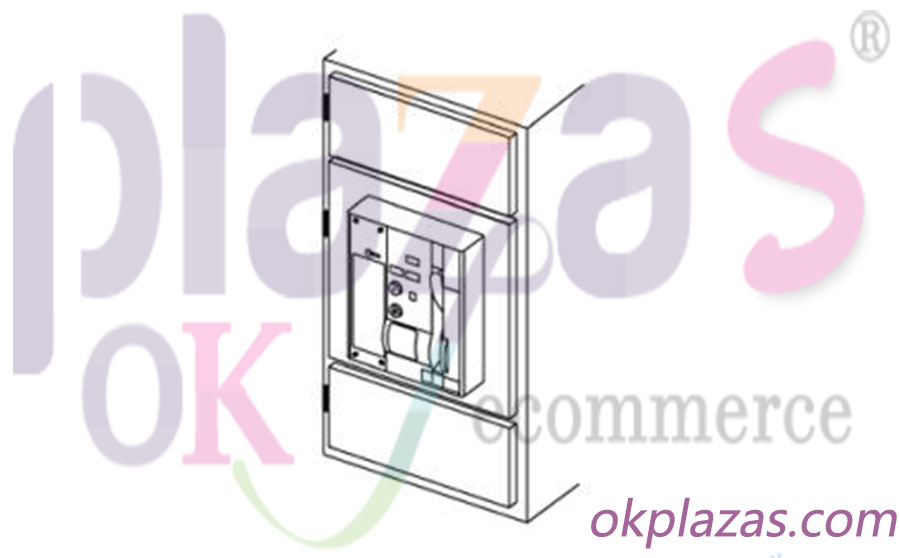
Position in the guide frame of Siemens circuit breaker 3WT
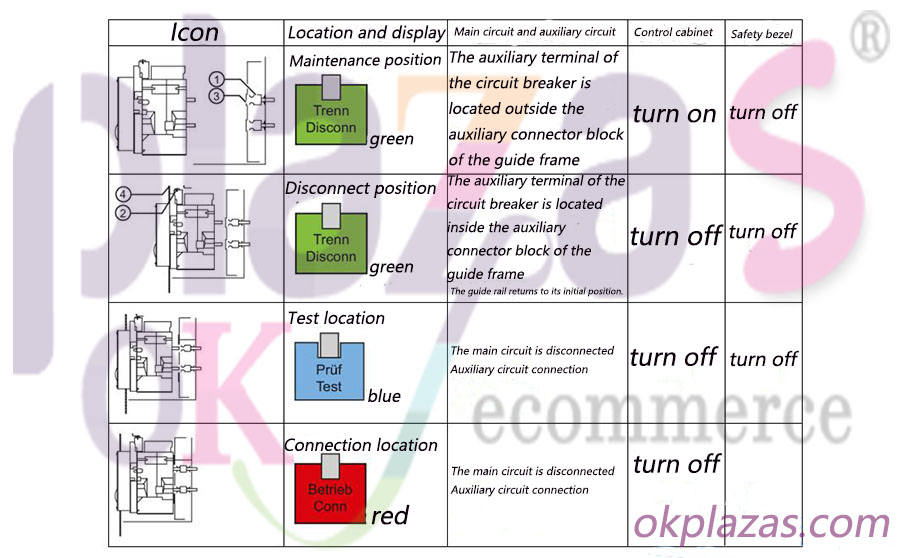
①Main circuit, ②Auxiliary circuit, ③Safety baffle, ④Control cabinet door.
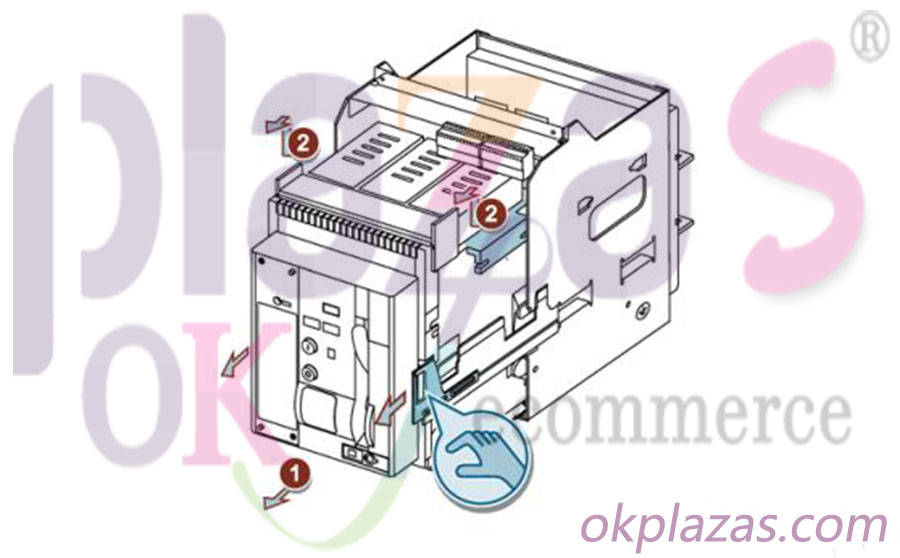
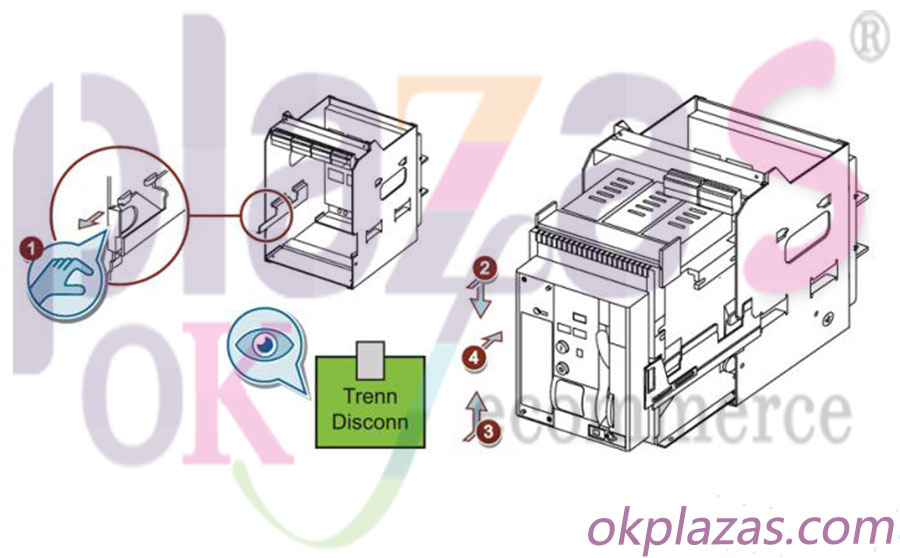
Siemens circuit breaker 3WT is taken out of the guide frame
1.Take out the circuit breaker (as shown in the figure below)
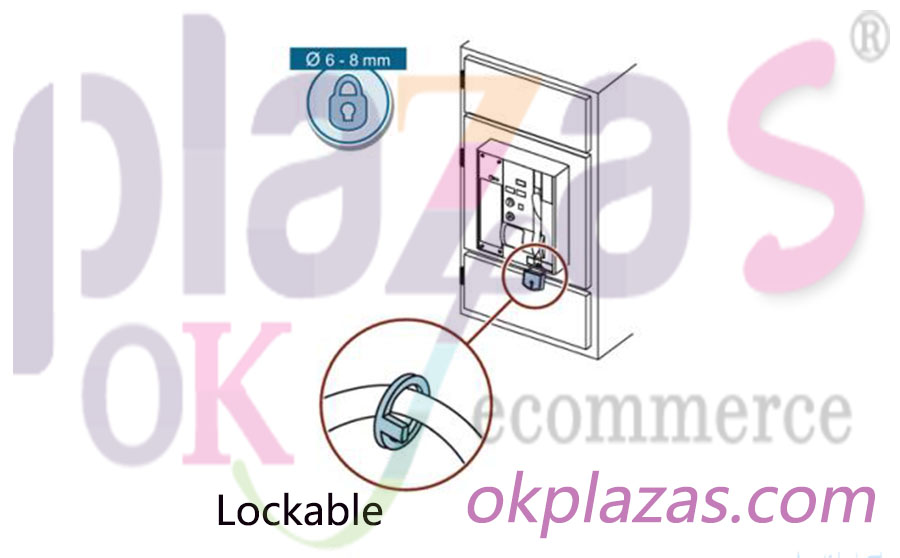
2.Interlocking device (as shown in the figure below)
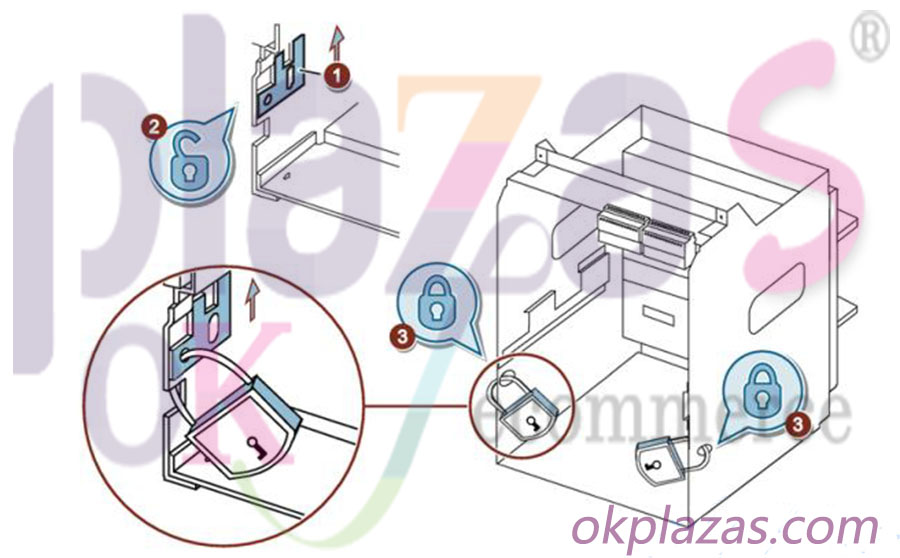
To lock the safety baffle, the rail can be locked by two padlocks to prevent the installation of a circuit breaker.
Siemens circuit breaker 3WT inserted in the guide frame
Note: If there is a lock, remove it.
①Pull out the guide rail; ②Insert the circuit breaker; ③Lift the circuit breaker slightly; ④Push it into the end stop of the off position. Only when the guide rail returns to its starting position and the auxiliary contacts are hidden, the correct arrival can be determined position.
Close the control cabinet door.
Siemens circuit breaker 3WT door sealing frame IP41
1.Prepare to open and close the equipment door
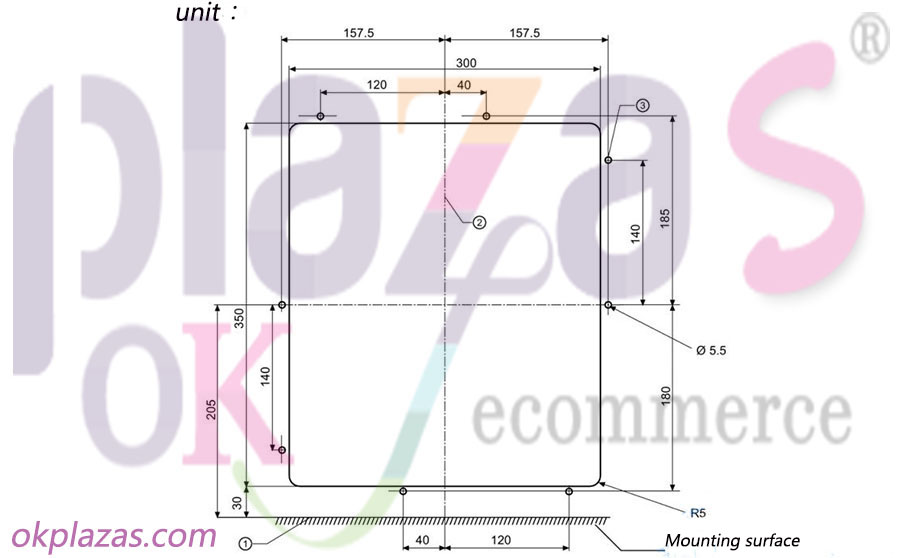
①The installation surface of the circuit breaker or guide frame;
②The center line of the front panel;
③The eight installation holes of the door seal frame.
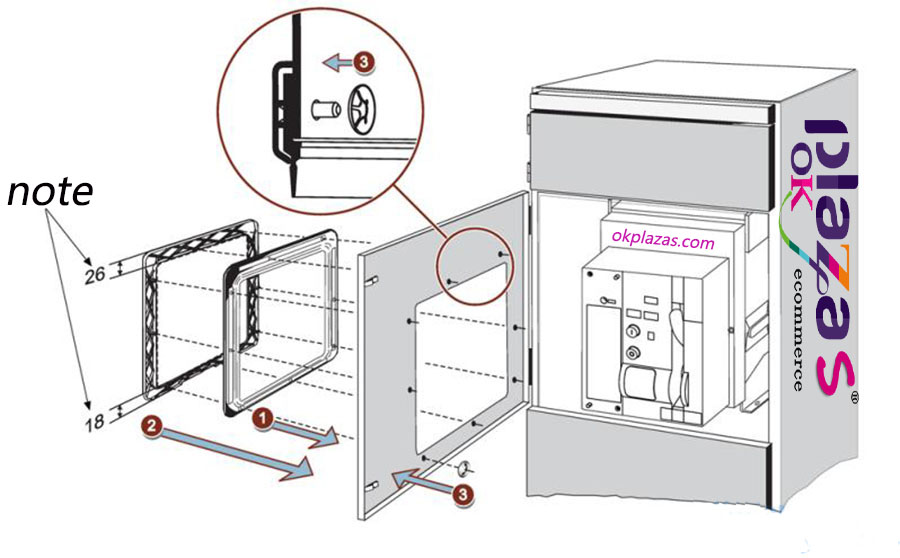
2.Install the sealing frame (as shown in the figure below)
Siemens circuit breaker 3WT connection method
1. Connection row
Warning: Note that the fastening screws on the upper and lower part of the connecting row on the back of the guide frame are live!
The 3-pole product example in the figure below is for reference only.
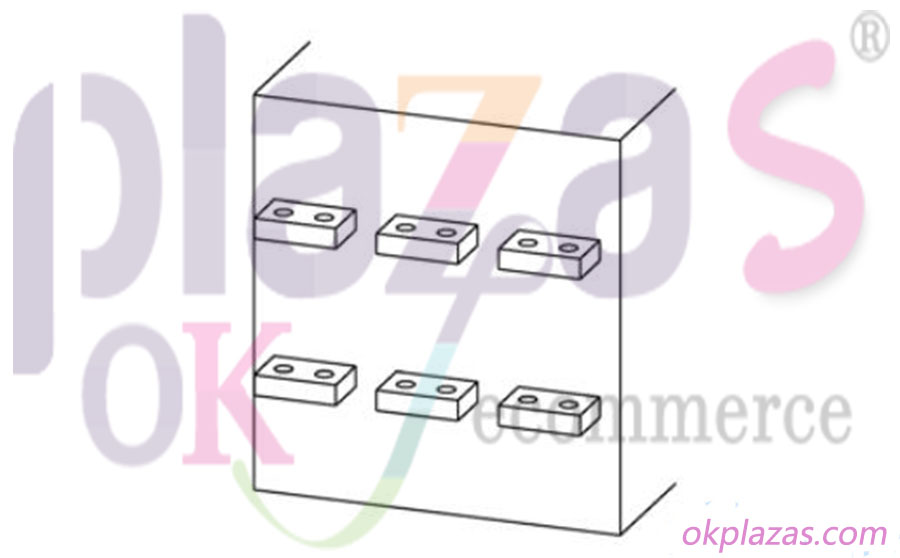
1.1. Horizontal connection
Horizontal connection is the standard connection method of fixed Siemens circuit breaker and guide frame.
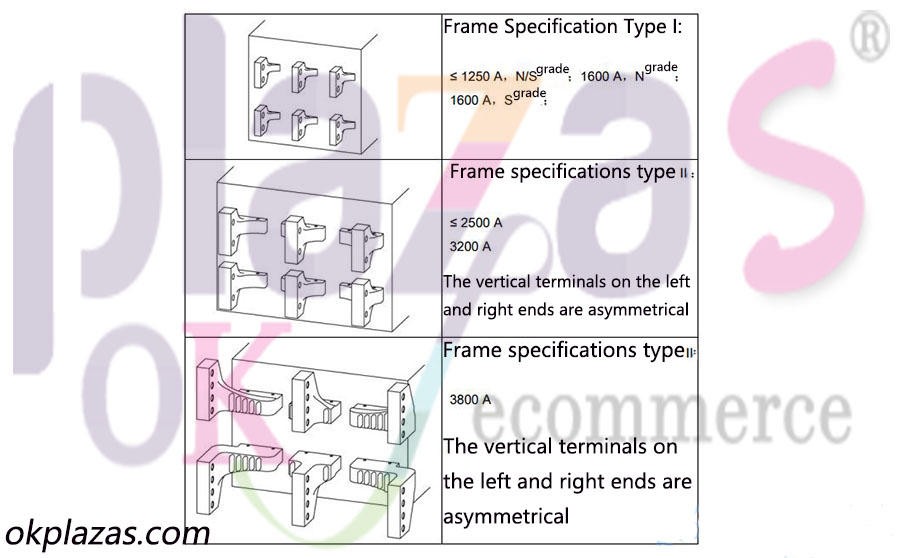
1.2. Vertical connection
1.2.1. Take a 3-pole product as an example for a fixed circuit breaker:
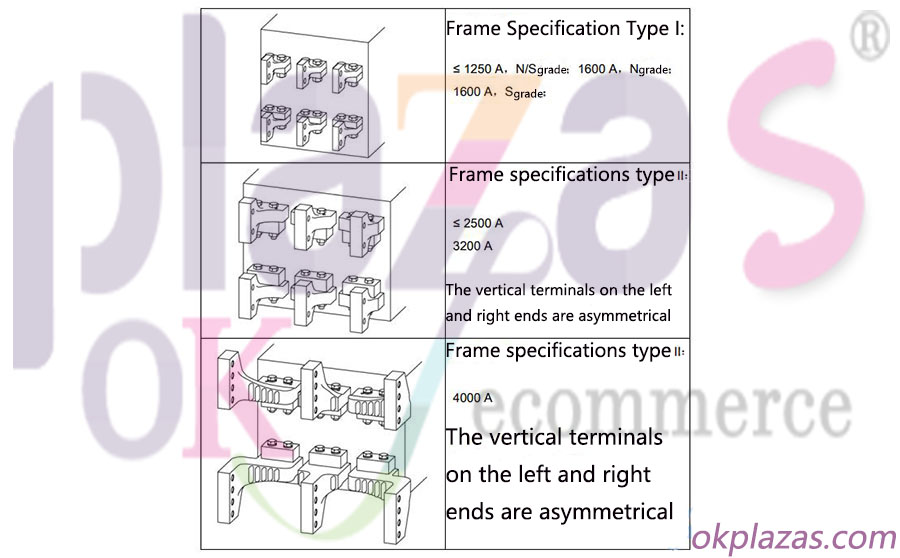
1.2.2. The guiding frame takes the 3-pole product as an example:
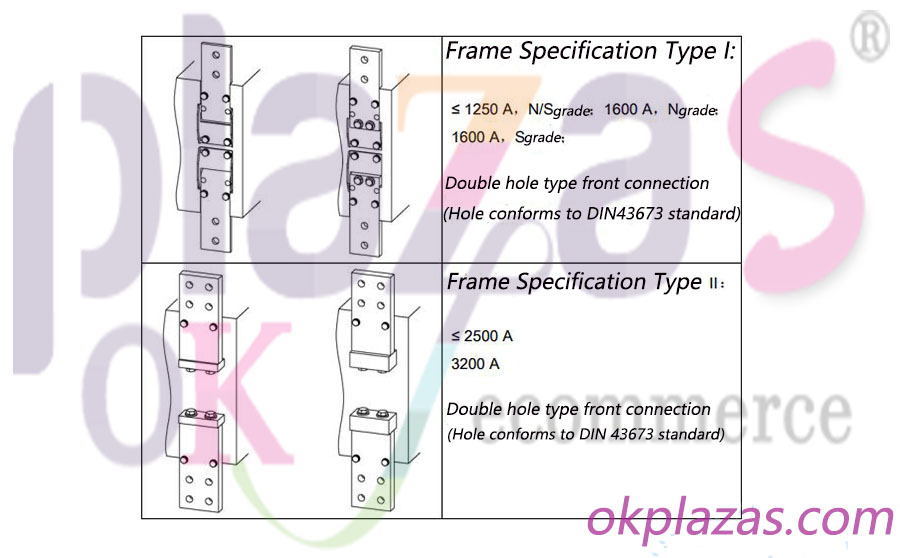
1.3. Front connection
1.3.1. Fixed circuit breaker:
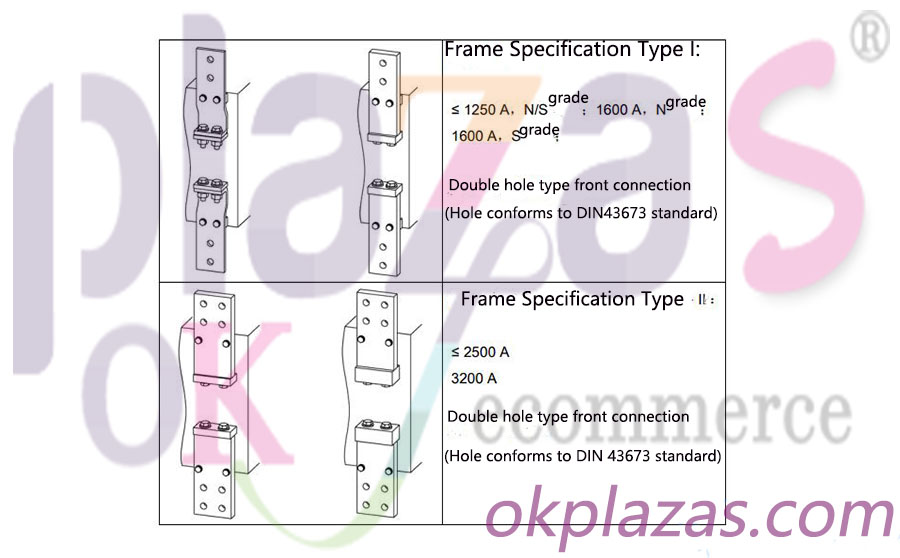
1.3.2. Guiding framework:
2. Connection of main circuit
Clean the main circuit connection bar and copper bar of Siemens circuit breaker

Main circuit connection requirements:
Wiring screw with strain washer (inner diameter = 12 mm, in line with DIN 6769-Fst), M12;
Recommended tightening torque, 70Nm;
The screw strength requirements are in line with DIN267 8.8.
2.1. Connect the front terminal of the circuit breaker
Disconnect the main circuit/control circuit from the power supply, roll the withdrawable circuit breaker to the maintenance position, and open the circuit breaker mechanically.
2.1.1If there is enough wiring space behind the system

①Remove the arc extinguishing chamber;
②Fix the connecting row on the system side;
③Reinstall the arc extinguishing chamber.
2.1.2If there is not enough wiring space behind the system
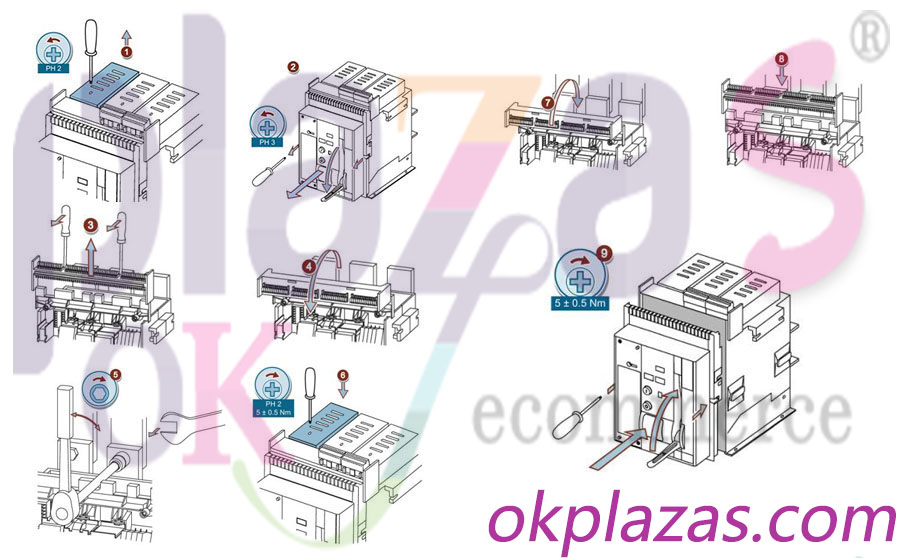
①Remove the arc extinguishing chamber;
②Unscrew the screw and pull out the operation panel;
③Unlock the secondary connector and pull it upwards;
④Flip the secondary connector forward.
⑤Fix the system side connection bar;
⑥Reinstall the arc extinguishing chamber;
⑦Flip the secondary connector backwards;
⑧Lock the secondary connector;
⑨Reinstall the operation panel and tighten it.
2.2. Support the main line

①Horizontal connection;
②Vertical connection;
③Front connection.
3. Connection of auxiliary circuit
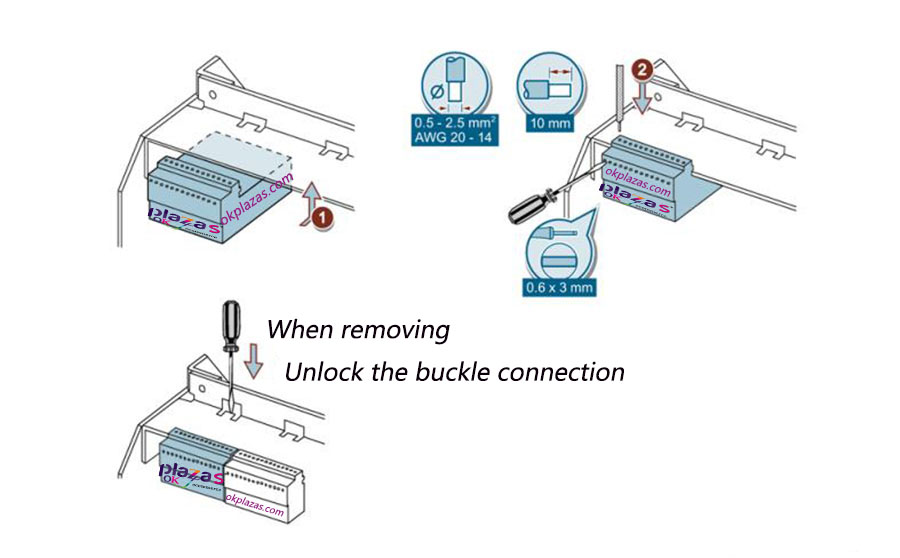
3.1.For fixed circuit breakers, connect the wires to the connector
① Loosen the connector;
② Connect the wire (note the coding);
③ Reinstall the coded connector.
Note: The auxiliary circuit wires can only be laid in the front area of the Siemens circuit breaker.
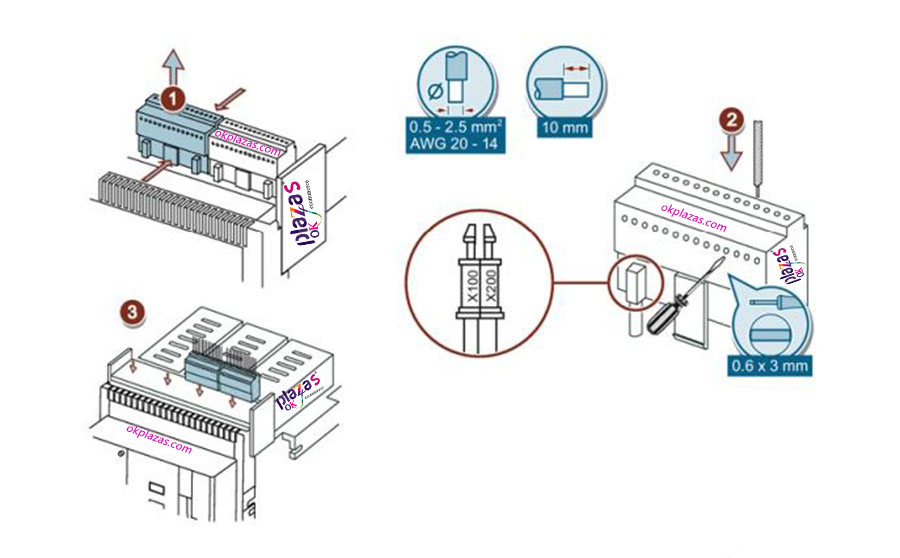
3.2.For withdrawable circuit breakers, connect the wires to the connector
①Install the connector;
②Connect the wire.
Note: The auxiliary circuit wires can only be laid in the front area of the Siemens circuit breaker.
3.3.Laying of auxiliary circuit wires on the system side
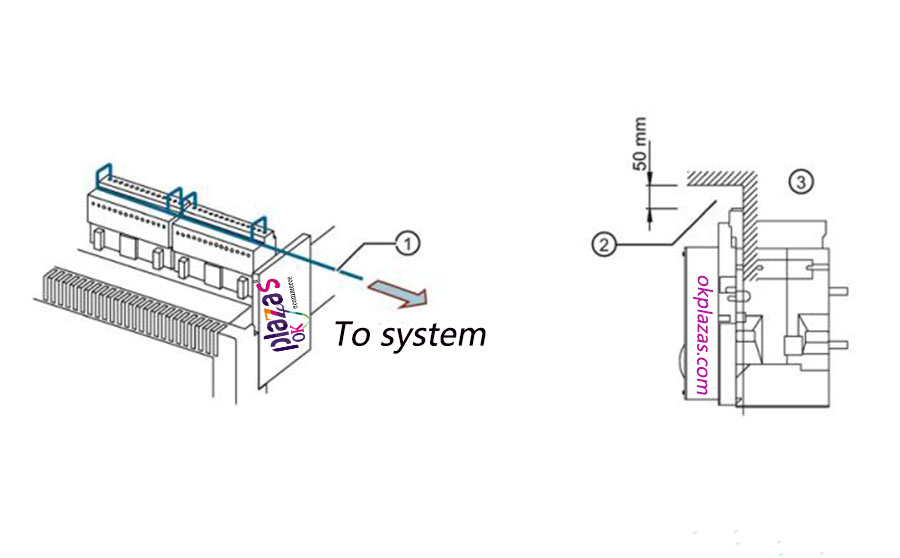
①Auxiliary circuit wires;
②Areas where auxiliary circuit wires are allowed to be laid;
③Area where auxiliary circuit wires are forbidden to be laid.
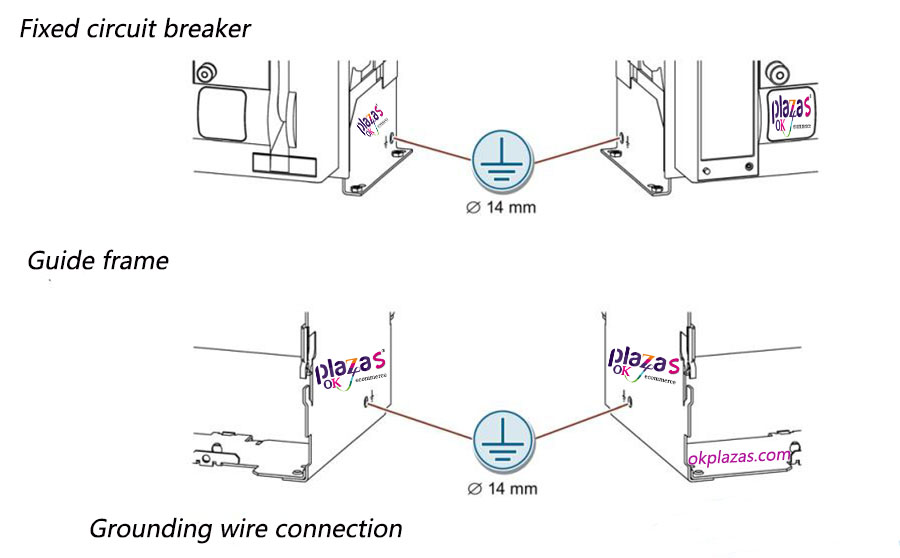
3.Connection of ground wire
The above is an introduction to the installation and connection of the Siemens circuit breaker 3WT, I hope to help you. okplazas.com Motor Mall is a professional agent for sales of Siemens and other products, welcome to e-mail: [email protected] for consultation, and you can also contact wechat: 1368942098 online customer service for product consultation!
-
The principle and application field of Autonics panel products (handling)
 June 12, 2021
 -
New product launch SRH1 series single-phase SSR with integrated heat sink
 June 12, 2021
 -
New product launch SRH1 series single-phase SSR with integrated heat sink
 June 12, 2021
 -
Otto protection grade IP69K new product launched Ø18mm cylindrical (SUS316L housing) photoelectric sensor BRQT series
 June 12, 2021
 -
Autonics adds shading motion mode sensor
 June 12, 2021