The use method and connection method of the ammeter
The use method and connection method of the ammeter
Rules for the use of ammeter:
①The ammeter must be connected in series with the electrical appliance in the circuit (otherwise it will be short-circuited and the ammeter will be burned.)
②The current should enter from the "+" terminal and exit from the "-" terminal (otherwise the pointer is reversed and it is easy to bend the needle.)
③The measured current should not exceed the range of the ammeter (you can use the method of trial touch to see if it exceeds the range.)
④ It is absolutely not allowed to connect the ammeter to the two poles of the power supply without using electrical appliances (the internal resistance of the ammeter is very small, equivalent to a wire. If the ammeter is connected to the two poles of the power supply, the pointer will be skewed in the light, and it will burn out in the heavy Ammeter, power supply, wire.)
Note: Burn the meter (ammeter) first, then destroy the source (power supply)
Ammeter use steps
1. Adjust the zero calibration button with a flat screwdriver.
2. Selection of range (estimated by experience or trial touch method)
There are three views and three questions for an ammeter. First, see the range of the ammeter, which is usually marked on the dial. After confirming the number of amperes indicated by the largest one, connect the positive and negative terminals of the ammeter to the circuit and observe the position of the pointer to read. In addition, an ammeter with an appropriate range must be selected. You can try to touch it first, if the pointer swing is not obvious, change to a smaller range meter. If the pointer swings at a large angle, change to a long-range watch. Generally, the pointer is around the middle of the dial, and the reading is more appropriate.
One look: range, the measuring range of the ammeter.
Second look: the division value, how much a small grid on the dial represents.
Three look: pointer position, how many division values the pointer position contains.
Ammeter reading
1. See the range clearly
2. See the division value clearly (generally speaking, the scale value of range 0~3A is 0.1A, 0~0.6A is 0.02A)
3. See clearly where the hands are staying (be sure to observe from the front)
Preparation before use:
1. Adjust zero, use a flat screwdriver to adjust the zero button.
2. Select range (estimate by experience or use trial touch method)
How to use the ammeter
1. Connect the table
The ammeter must be connected in series in the circuit to be tested so that the current flows in from the "+" terminal of the ammeter and flows out from the "-" terminal. When using an ammeter, its two terminals must not be directly connected to the two poles of the power supply, otherwise the ammeter will be burned out due to excessive current.
2. Select the range of the meter
The ammeter has three terminals. As shown in the figure above, if the ammeter is connected to the "+" and "0.6" terminals, the range is 0.6A. Read the set of values on the dial; if it is connected to the "+" and "3" on the two binding posts, the range is 3A, read the set of values on the dial. Before the experiment, if you don't know how to connect, you can first estimate the current value in the circuit. If the estimated current is less than 0.6A, the range should be selected; if the estimated current is greater than 0.6A but less than 3A, the range should be selected. If it is not possible to estimate, you can use the method of trial touch (fix a terminal, use the other thread of the circuit to quickly test the terminal with the largest range), and then select an appropriate range according to the deflection angle of the ammeter pointer.
3. Test circuit
After connecting the physical diagram according to the circuit diagram, a trial connection must be performed. When trying to connect, carefully observe the deflection of the ammeter pointer. If the pointer does not deflection, it means that there is an open circuit somewhere in the circuit; if the pointer deflection in the opposite direction, it means that the positive and negative terminals of the meter are connected reversely; if the deflection angle of the pointer is too large, It means that the range is selected too small; if the deflection angle of the pointer is too small, the range is too large. Then according to the situation observed during the trial connection, make corresponding adjustments before carrying out related experiments.
The wiring method of 380V ammeter and voltmeter is illustrated as follow
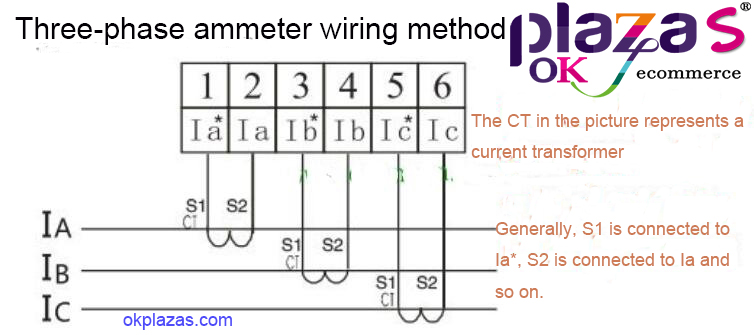

The three-phase ammeter mentioned here is not an old pointer ammeter, but a new type of intelligent digital ammeter, which can adapt to different signal inputs. It is not necessary to replace the instrument to replace the transformer of different specifications, but only need to set and mutual inductance on the instrument The same current transformation ratio is sufficient.
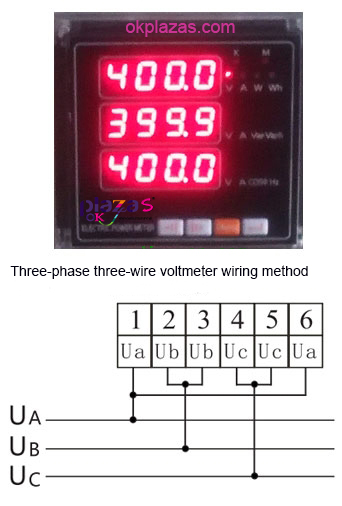
The wiring of the three-phase voltmeter is much simpler. The 380V three-phase power supply can be directly input without external transformers and other conversion appliances. But the 380 three-phase voltmeter wiring is divided into three-phase three-wire wiring for displaying 380V and three-phase four-wire wiring for displaying 220V. How to connect? Please see the following diagram:
Connect into three-phase four-wire to display 220V phase voltage:


Connected into three-phase three-wire display 380V line voltage:
-
The principle and application field of Autonics panel products (handling)
 June 12, 2021
 -
New product launch SRH1 series single-phase SSR with integrated heat sink
 June 12, 2021
 -
New product launch SRH1 series single-phase SSR with integrated heat sink
 June 12, 2021
 -
Otto protection grade IP69K new product launched Ø18mm cylindrical (SUS316L housing) photoelectric sensor BRQT series
 June 12, 2021
 -
Autonics adds shading motion mode sensor
 June 12, 2021